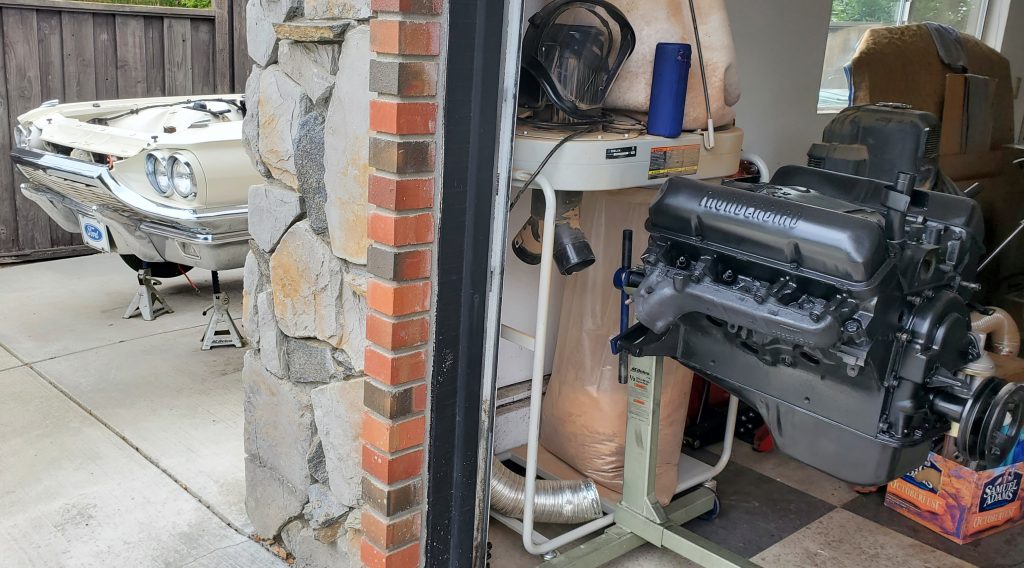
A couple of weeks back, I spent a weekend re-organizing my garage space, and part of that project included breaking out the welding cart so I could install an oxygen sensor bung on the exhaust (in anticipation of a future EFI system).
At this point, all that I really need to do is move the engine about 15 feet to the left. Simple!
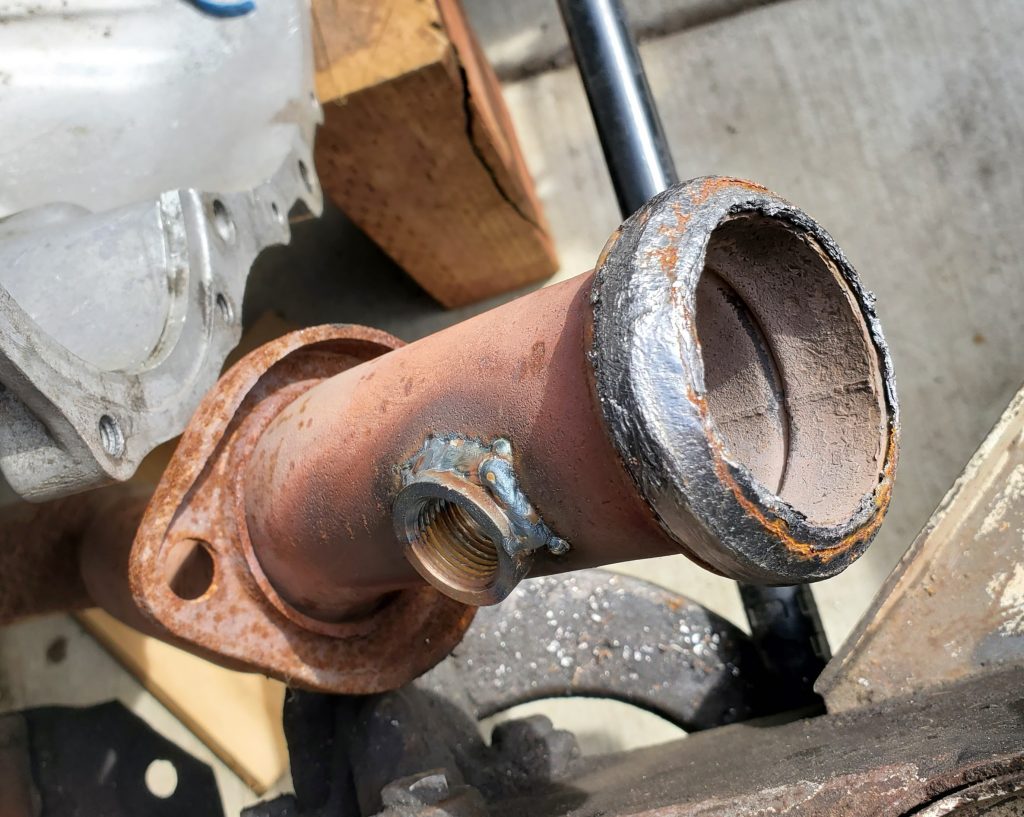
After a few practice welds (and remembering to turn on the gas for my MIG welder!), I felt comfortable enough to take a stab at the real thing. I made the opening with a step drill, then got a pretty good start welding the bung itself, at least from the side that’s easy to reach.
I had practiced getting the welding tip around between the fender and the exhaust, but when it came to the real thing, I realized that I had the setting sun at my back, and the glare inside my welding mask meant that I couldn’t see. I packed up my gear to wait for better conditions.
Later that night, I woke up and realized that I had left the exhaust flange on the wrong side of the bung!
Nice welds, wasted.
When the next cool overcast morning rolled around, I cut off the nicely welded bit, drilled the hole again and welded in another (after moving the flange). The new welds were not nearly as nice. I’m hopeful it’s sealed. If not, I’ll have to drop the exhaust to try again.
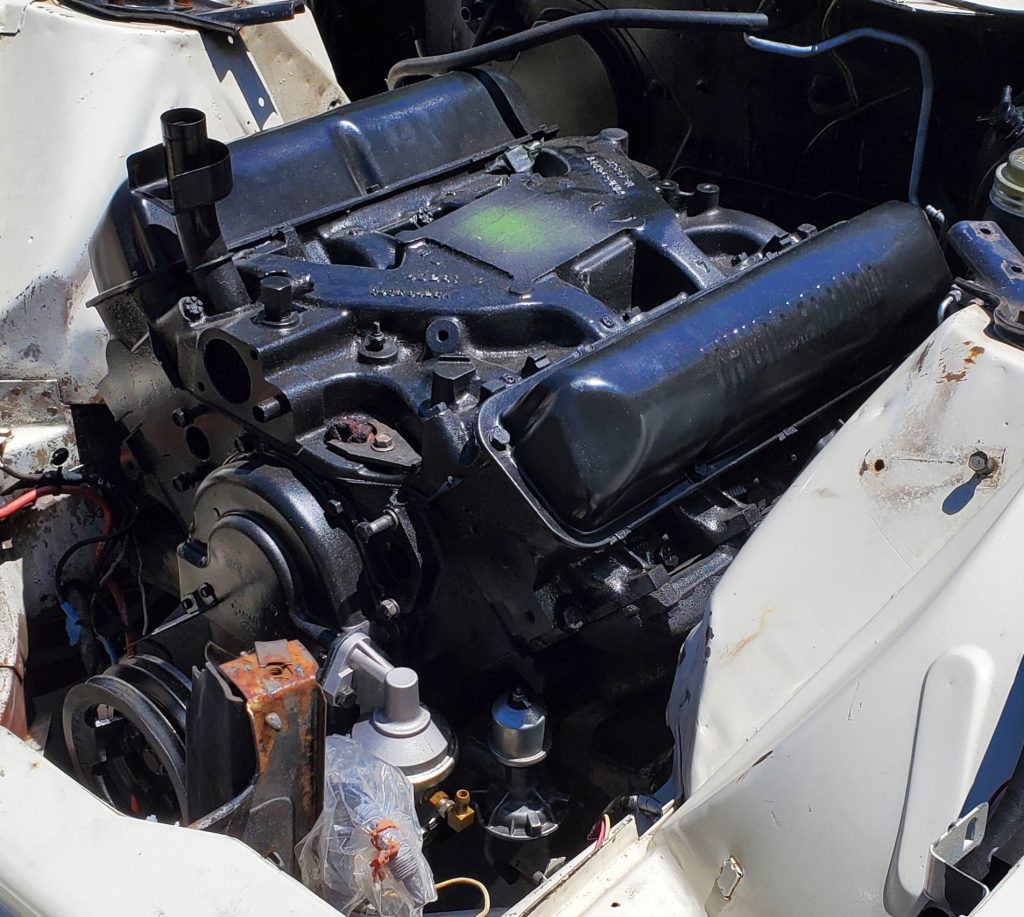
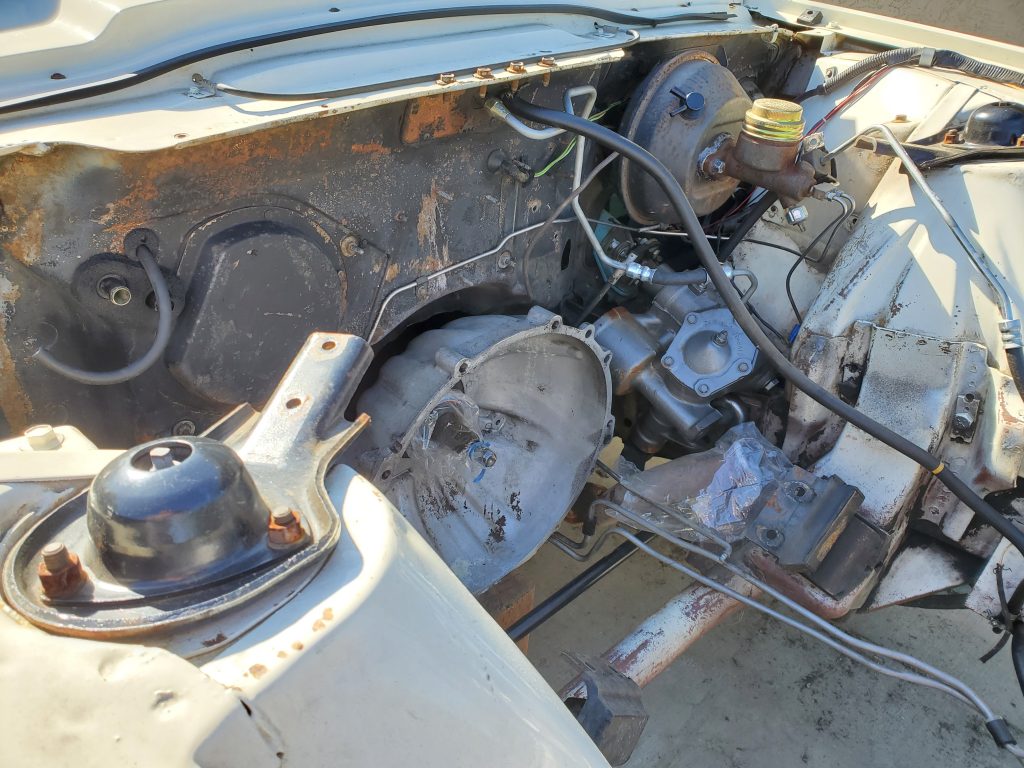
With the shelter-in-place orders not yet expired here, I decided to take a stab at installing the motor without an assistant. (My driveway has some slope to it, so my wife did stand by for safety’s sake most of the job.) I figured there’d be a lot of up-and-down—normally I work below while my son handles the hoist and topside work—and I was not disappointed.
Nice to see a motor sitting there. The engine bay had been empty for a long while.
There was the usual frustration of working to get a bulky mass in just the right position, but also that satisfying moment when the engine comes together with the bell housing. Overall, installation took four hours including setting up tools beforehand. Much of that time was spent lining up and screwing in the engine mount bolts—a job that looks easy but is decidedly not.
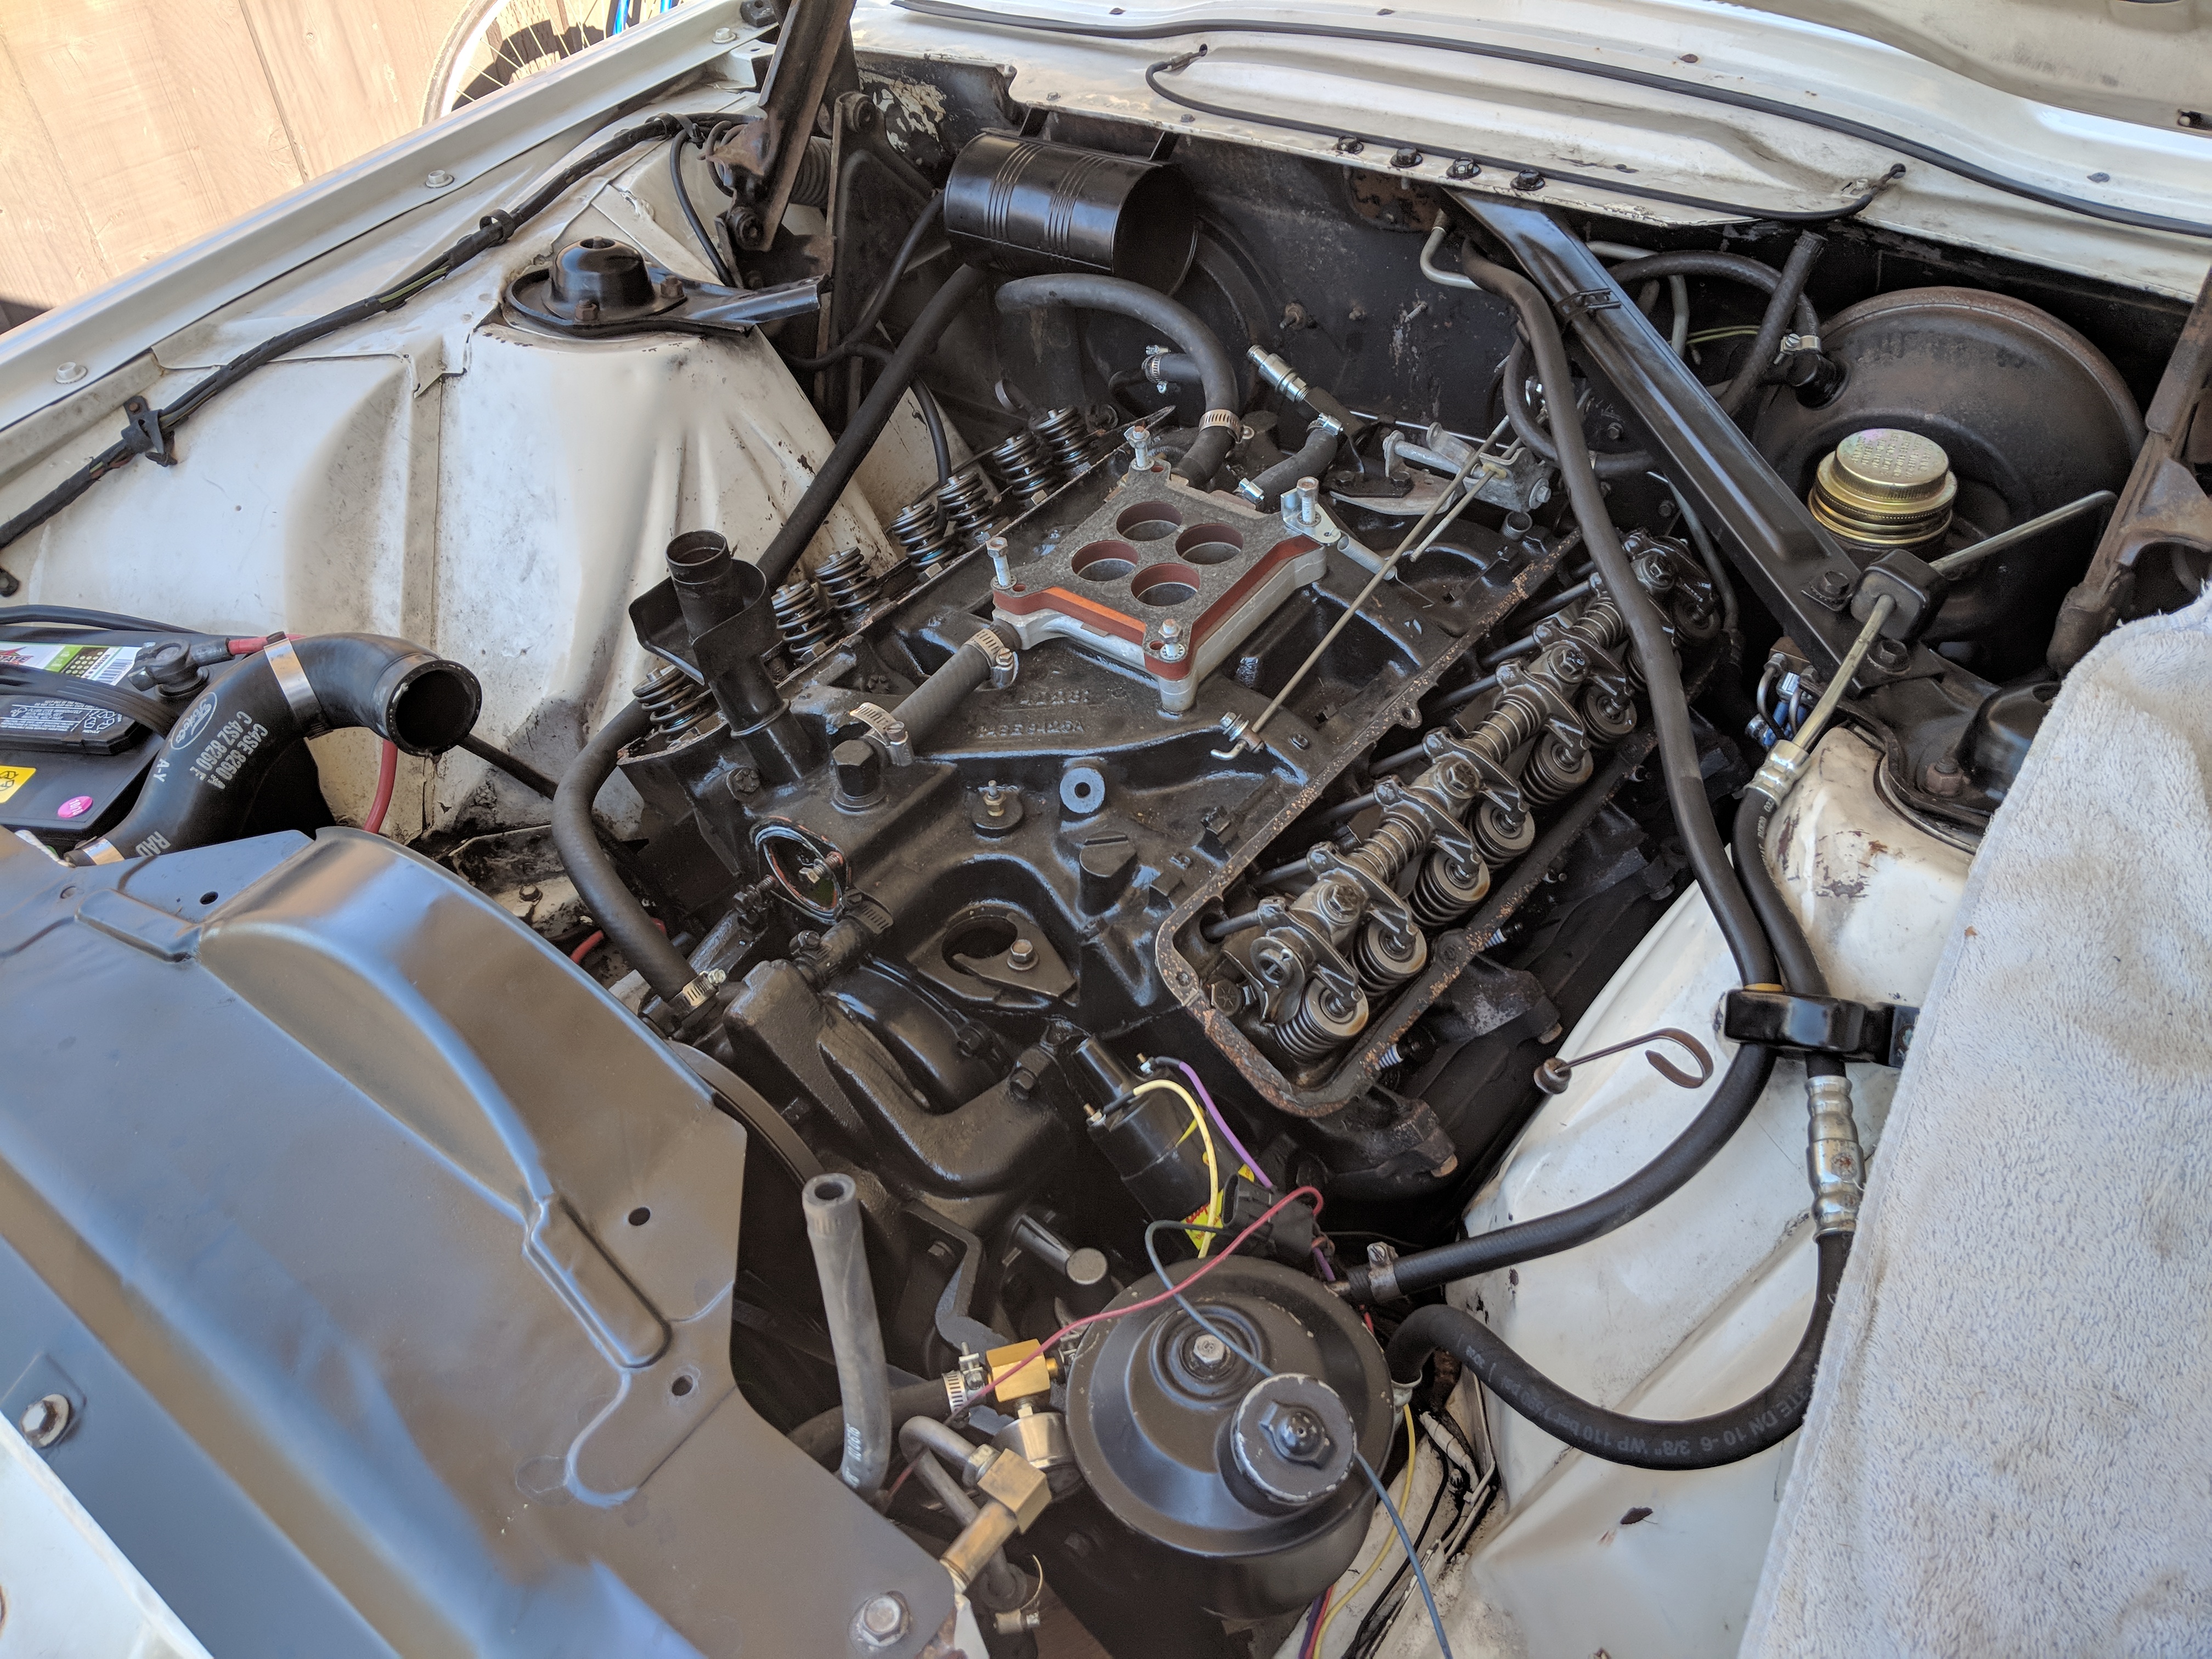
There is much left to do before it’s ready to run: accessories to install, re-wiring part of the engine harness, hooking up the exhaust, and more. Looks like I have a shot at getting it running this month, though, which would be awesome.
The weather was perfect for painting and my motivation level was high. As a result, last few days have been a nice steady stream of Thunderbird work.
I hit the firewall, brake booster and master cylinder with POR-15 paint prep, which magically neutralizes rust. The instructions have you spray it on, then keep the area damp with it for around 30 minutes. In warm weather and direct sun, that was a lot of spraying. Afterwards, the solution is washed off with water, which always seemed a bit odd in a rust preventative. I toweled off what I could and left it to dry.
Masked and tarped. You can see that the surface rust is gone and the grey film left by the paint prep spray.
I masked as best I could and used old bedsheets as additional insurance. The tiny spray pattern doesn’t allow for much overspray, so this was a little overkill.
The following morning was overcast, but windless, dry, and warm (actually really odd weather for us). The flat light made it a bit difficult to see, but I got a relatively smooth first coat down. (I really wanted one coat to be good enough, but once it was dry and the spray gun cleaned, I could see thin spots and unevenness. Once I did, I couldn’t rationalize leaving it as is.)
After the first coat. You can see the unevenness on the blower motor cover and the missed area under the lip of the cowl. Some of this was having the spray too thin, others I blame on the poor light.
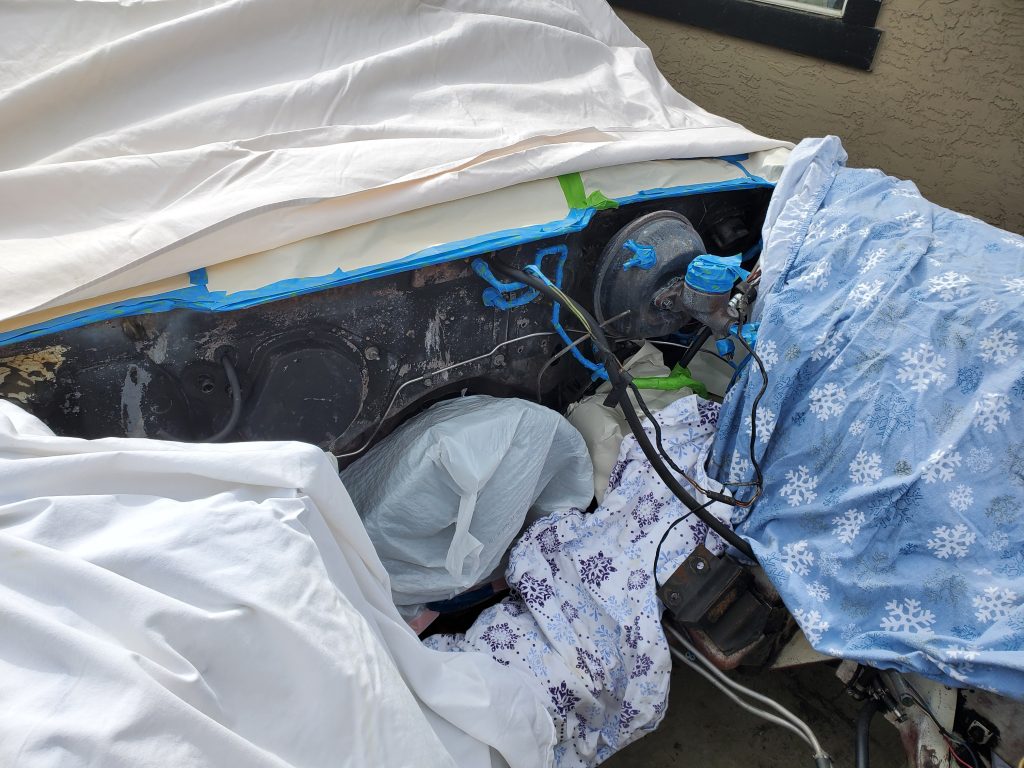
This morning was sunny, but no wind, so I donned my respirator, re-draped the old bedsheet tarps and climbed into the engine bay for the last spray. I turned up the product on the gun to improve the coverage a bit.
Final coat. Not the greatest photo.
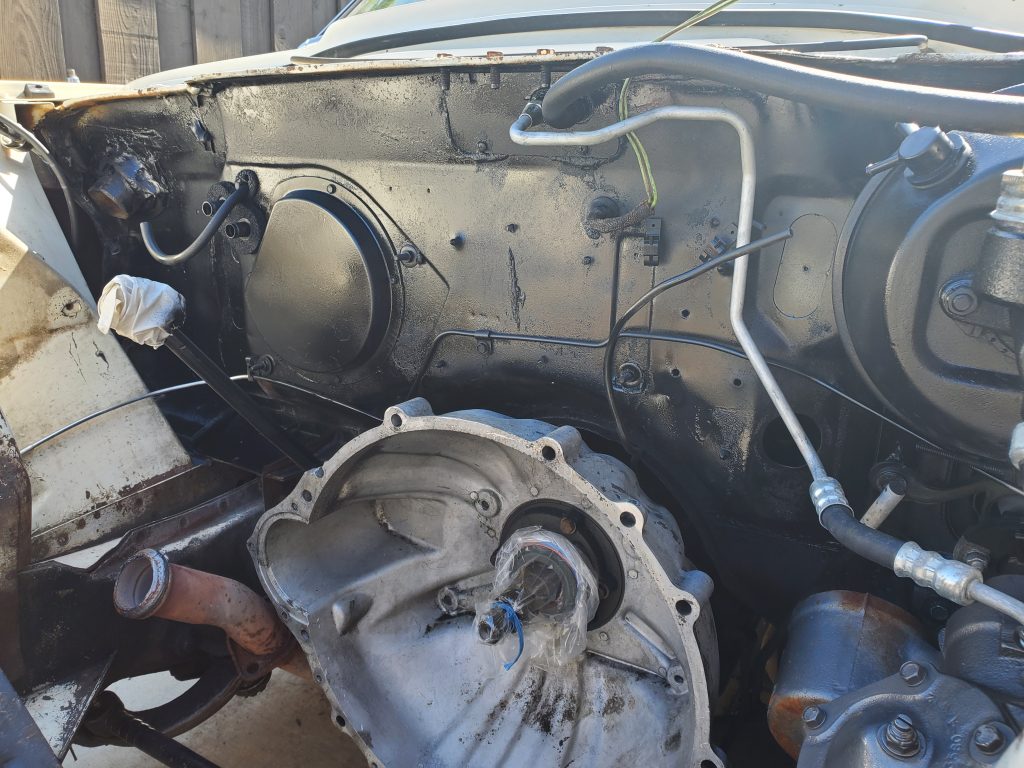
The second coat went fast, and I ended up with a nice satin finish (glossy paint + the rough surface of the firewall) that I rather like. I used POR-15 engine paint–the same that I used on the motor. It’s durable and easy to touch up.
The best part of any painting project is unmasking. I think this will be a nice backdrop to the motor when it’s back in.
There’s one last item before I’m ready to install the engine, and that welding in a small oxygen sensor bung on the exhaust pipe. It will be plugged for now, but it’s the first step on the road to electronic fuel injection.
For the past couple of weeks I’ve had “mask and paint Thunderbird engine bay” on my to-do list, so yesterday I spent the entire afternoon . . . tidying up the garage.
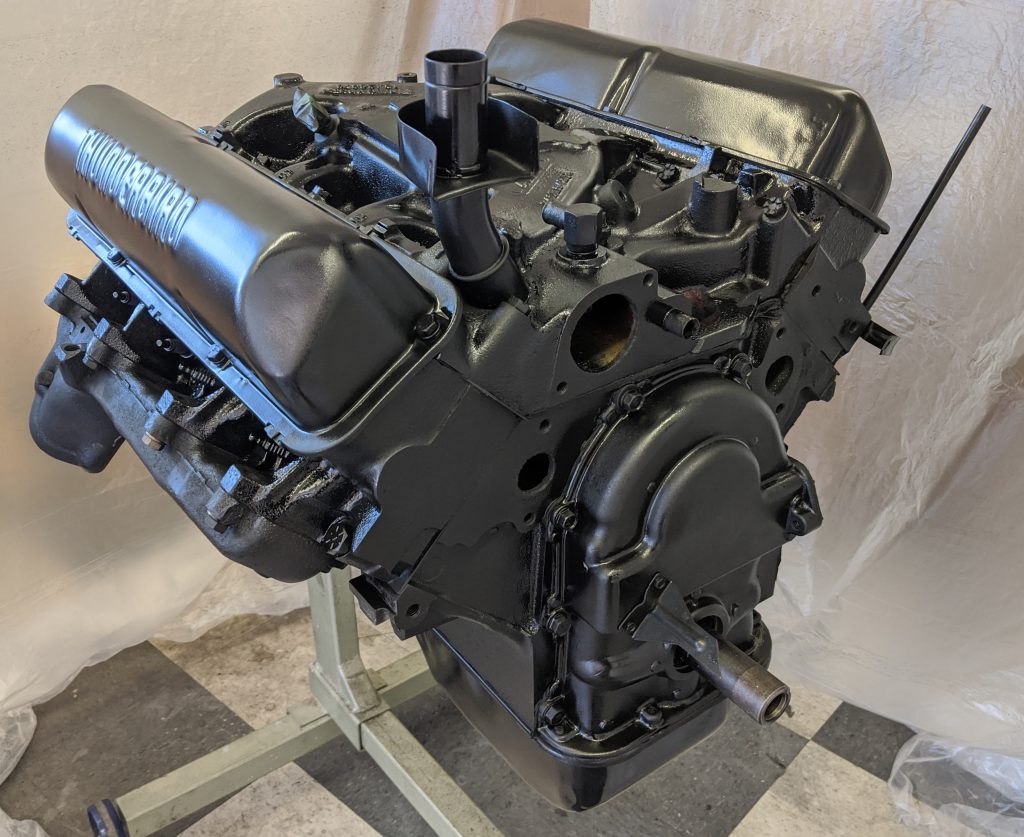
Since reinstalling the timing cover some weeks back, it seemed like the engine was close enough to done to think about engine bay prep. Once I cleared the cobwebs out of the garage, I could see that thought was a little premature. I had set up a makeshift workbench when this project began, just some plywood scraps on two sawhorses. On top were some mislaid tools (“Oh, that’s where that socket is!) and miscellaneous motor parts. Underneath were accessories like the alternator, fan shroud, etc.
Timing cover on, paint done. This is as good as it is gonna get.
I cleared off the top of the bench by reinstalling the harmonic balancer, fuel pump and oil filter adapter. While I was at it, I gave the engine a spin just to reassure myself that all was still well inside. (If I can acquire an oil filter and oil, I can pre-oil the internals, which would feel even better.)
Accessories installed. You can see that I took some time to clean the fuel pump. The oil filter adapter, not so much. (What’s with all those little fins, anyhow?)
With the engine pretty much assembled, I took down the temporary bench and moved all the remaining parts to the bench in my main workshop. They will be a real nuisance there (and hopefully a spur to pick up the pace). In the now clean garage, I pushed the motor into a corner and put my wife’s car in there.
Lots of work to needed to make this look pretty. In addition to masking off parts, I’m going to cut off some of the screws that project through and use POR-15 metal prep on the rusty areas. I have a very small HVLP paint gun that can get into tight areas while minimizing overspray. Still, this will be a chore.
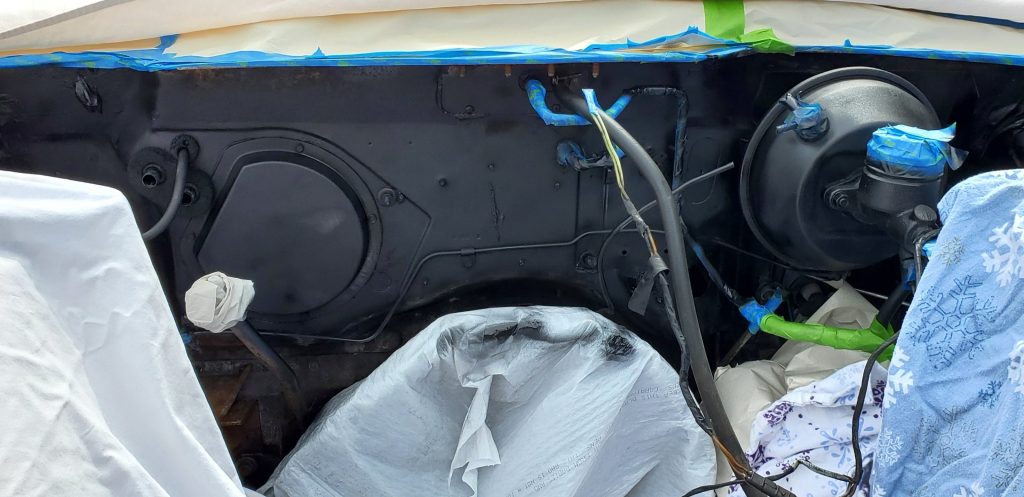
With the light fading and cocktail hour approaching, I pulled the cover off the ‘Bird just to assess the work needed for masking and painting. I pulled off the heater hoses and the vacuum lines at the brake booster, then removed the throttle linkage (finding it hard to believe that I was still doing disassembly). There are a lot of nooks and crannies on the firewall and painting it with major components in place won’t be perfect, but still worth doing.
I haven’t decided yet how to handle these hinges. (Except that they won’t be going back in looking like this.
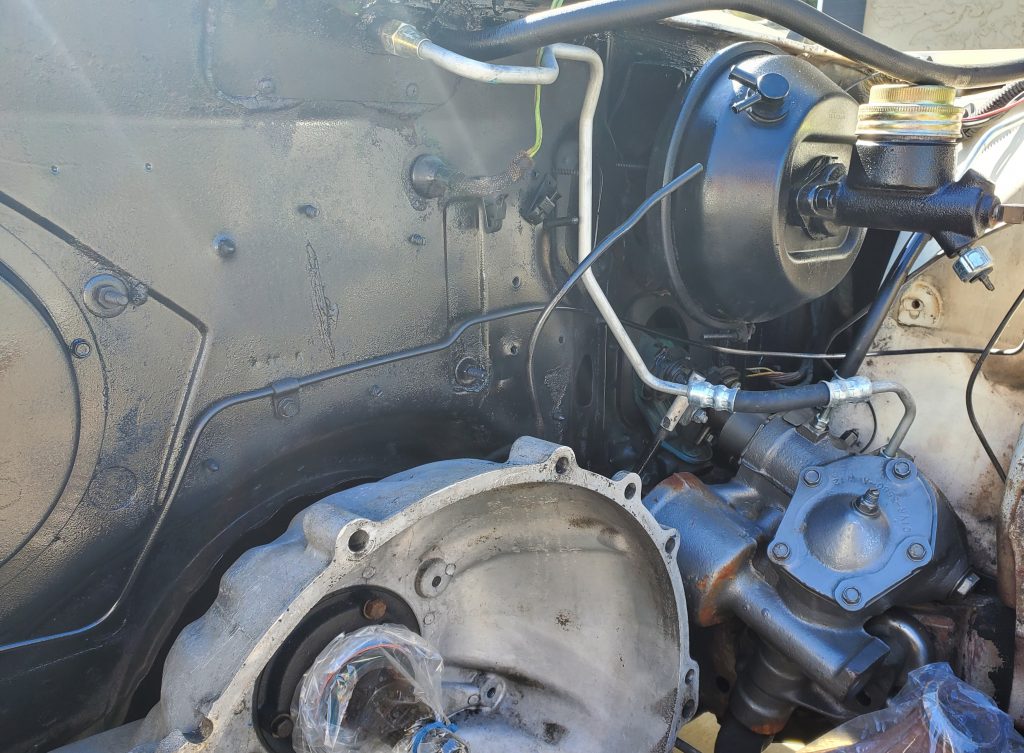
My plan had been to paint the firewall black and touch up the white around the rest of the bay. However, this car needs to get back on the road, so I’ll forgo the body color paint. To do that job properly, the engine bay really needs to be stripped bare, and at the rate I’m going, that could add months to an already-too-long project.
The forecast this week is sunny and hot with windy afternoons, so I’ll be masking when it’s not too hot and painting when I can find a warm, windless morning.
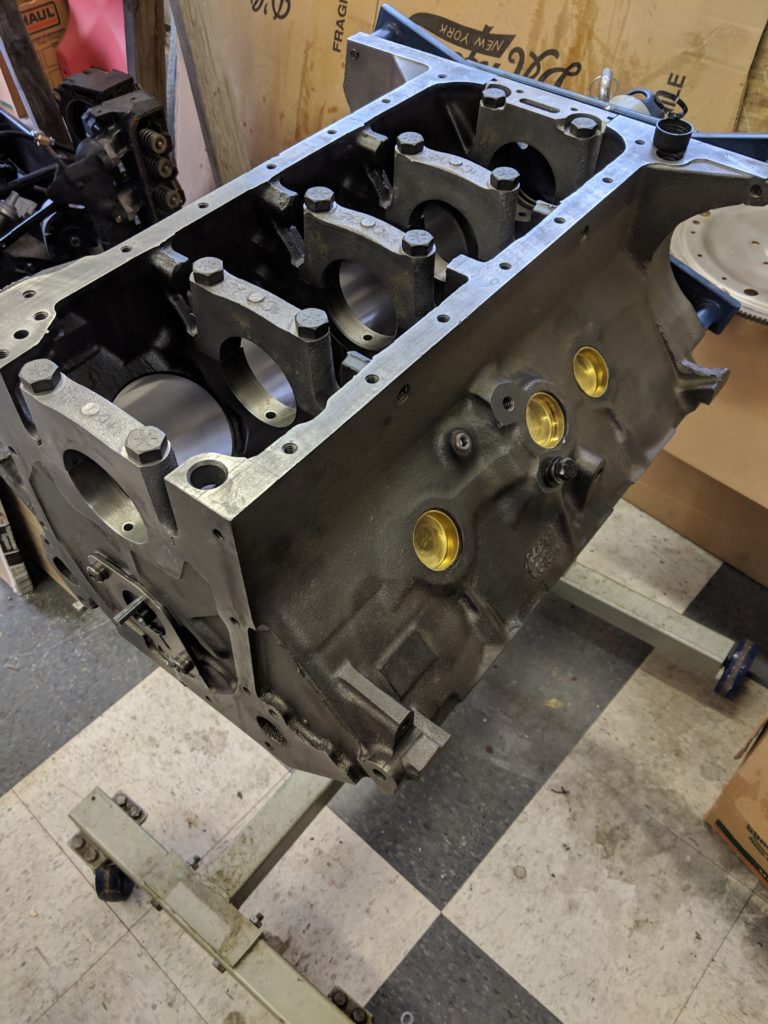
There hasn’t been a lot of time to tend to the motor, but with the damp weather we’ve been having, I was spending a lot of mental energy worried about rust in my newly conditioned block. It seemed best to get the bottom end installed, even if my schedule didn’t really permit it.
You can’t see it, but at this point the camshaft is installed—you can tell by the thrust plate and screws in the front. Also, I’ve got the freeze plugs in at this point. The block came with the oil gallery plugs installed, thank goodness—there are a lot of them.
I got the camshaft installed a week or two ago. The block came with the cam bearings installed, so it was just a matter of lubing up the cam and getting it seated in place. When it comes to cams like this, everyone says to take it slow and ensure that none of the lobs bump up against a bearing on the way in. I’m pretty sure that’s not humanly possible. I’ve installed a few of these now, and what with lining up the bearing races, dealing with a heavy hunk of iron and limited hand grips inside the block, it’s pretty impossible not to bump up against a bearing at least once during installation. No damage was done. I was moving slowly after all.
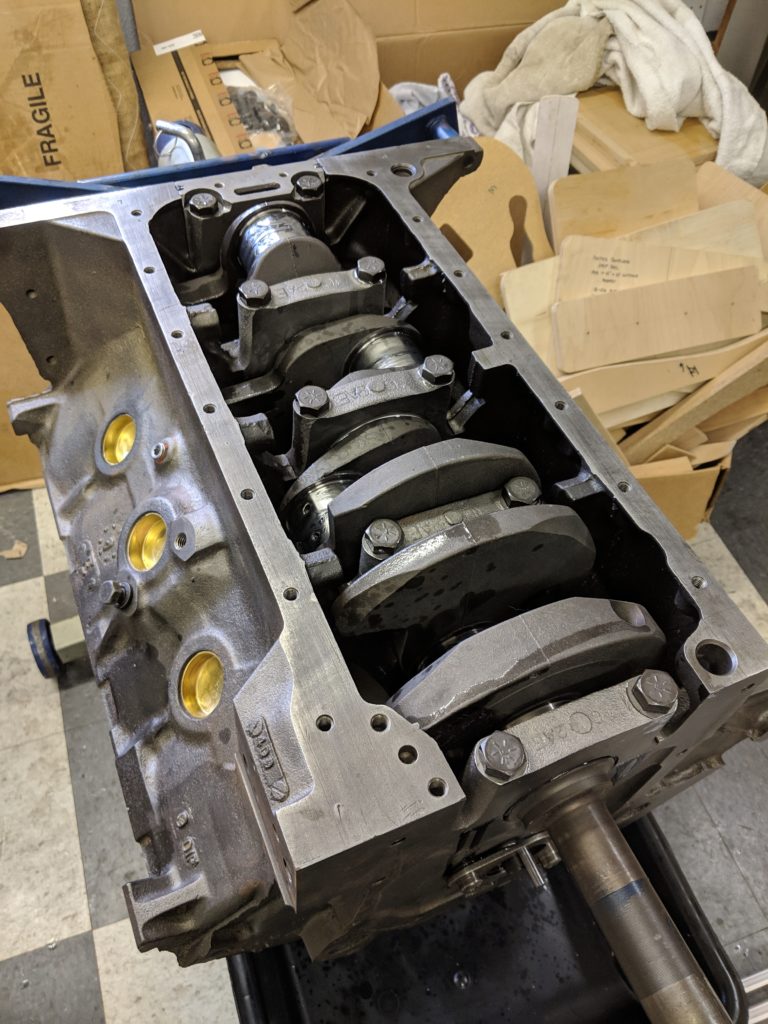
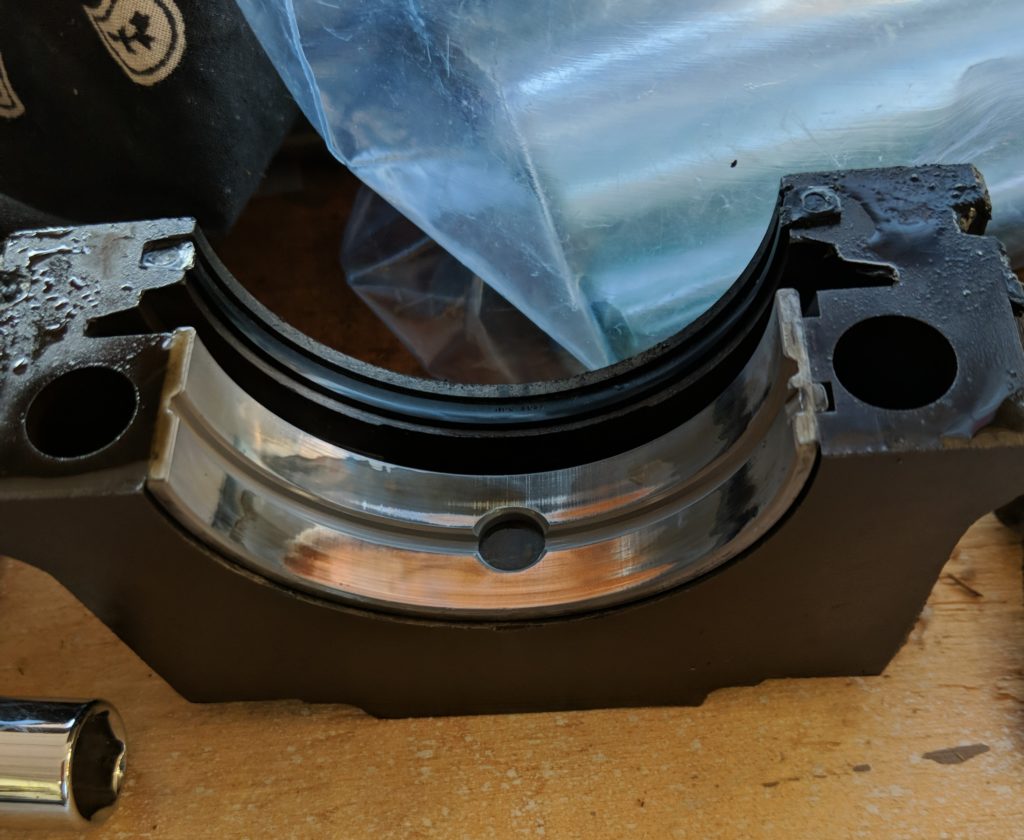
I tackled the crank last week, which seems like a straightforward job: insert the bearings, drop in the crank and torque down the caps. In my case, most of the caps fit very snugly into the block. Getting the cap square to the crank and still aligned with the bolt holes (while holding the bearing in place) sometimes took a little persuasion from a rubber mallet—and I always feel a little odd taking a hammer (of any sort) to an engine.
Crank is in and spinning freely. Those two dark spots on the rear-most cap are the bottom ends of the main seal (including the nails). They are supposed to be a little proud of the block, but after hammering in the nails, everything was flush. (Of course! I was hammering on them!)
The rear cap fit a little more loosely, thankfully, because it houses the rear main seal. This seal has six pieces, two half-rounds to seal the rotating crank, two silicon strips to seal the cap against the block, and two nails driven into the cap to hold the silicon elements tight. Once it’s all installed, it’s mostly hidden. There’s no way to know if it all went together properly
When putting the seal in place, I tried following the instruction in my rebuilding book (How to Rebuild Your Big Block Ford) and those that came with the seal. I find it hard to believe that the person who wrote either of those instructions every tried the process. After a protracted battle, the seals were in place and appear snug. The proof will come after a few miles on the motor. Of course, by then it will be too late to do much of anything about it if they fail.
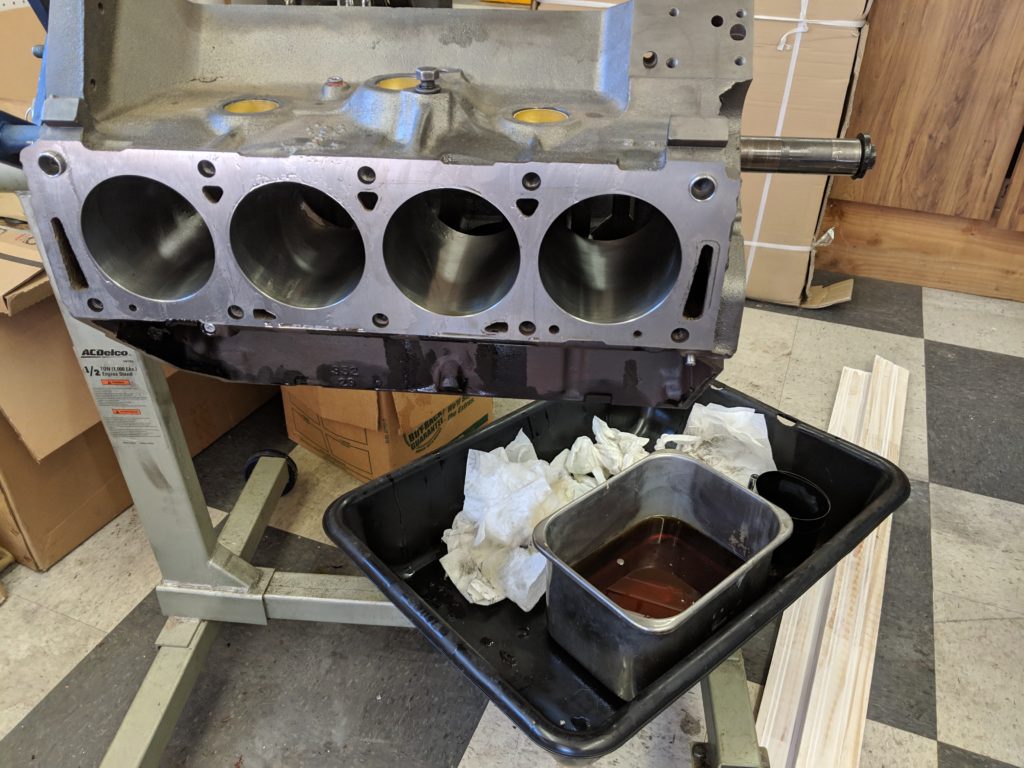
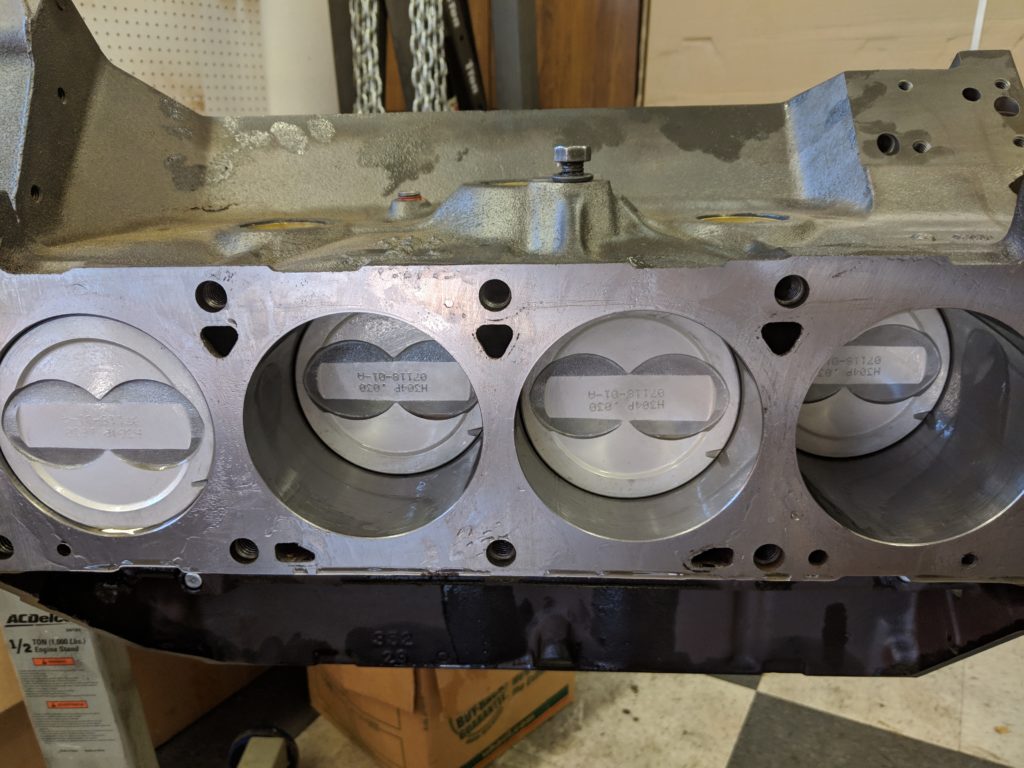
Today, I was finally able to take on the piston installation, which seems like a straightforward process. The book—now some 40 years old and showing it—says to install the bearings in the rods, install the rings (right side up, gaps spaced just so), dunk the piston in a can of oil(!), compress the rings and drive the piston into the cylinder with the butt end of a hammer.
Everything you need to prep a piston for installation, even a snazzy snow-themed drop cloth.
What’s not said is all the variables that go into that process. The rings fit very loosely on the piston. After drenching the whole thing in oil and wrapping the mess with a very slippery ring compressor, who knows if the ring gaps are still properly spaced?
A big pot ‘o oil for piston dipping, but a drip tray not quite big enough to catch the spills. I finally moved those baseboards out of my way, but not before oiling them up real good.
Driving the pistons into the bores, I felt pretty lucky that none of them got hung up on a loose ring, but was not at all prepared for the bearings to be shaken loose due to the pounding. I frequently found myself delicately trying to coax a bearing back into place just before the rod end seated on the crank.
One bank done. My machine shop thoughtfully labeled each of the assembled rods.
The most difficult part of this process was installing the second bank of pistons. Tolerances between the rods are pretty tight; the second rod on the journal requires some finesse to seat. The caps for those rods required some gentle persuasion before settling into position. (I, uh, had to tap some of them with a hammer.) In the end, the crank rotates smoothly, but certainly with a tightness it didn’t have in the old, worn block.
Second bank complete. The book says to install the pistons with the notch towards the front. Some pistons have an arrow, which seems more self-evident to me.
Tomorrow, I’ll double check my work with fresh eyes and take a look at next steps. It would be great to have the heads in place and the oil pan on, if even loosely, to get the internals sealed off from the elements.
I’m getting close to having a working motor again.
The leads I had on clean blocks or built-up short blocks didn’t pan out. One, on Craigslist, was an outright scam.
Towards the end of November, I found a Thunderbird specialist in Southern California who had numerous blocks on hand, some reconditioned, others not. Asking around the community, I found that he was a reputable dealer, and that others had good experiences with him.
I sold the old block for scrap. Got about $18 for it, too.
He located a reconditioned block, sonic tested and bored .030 over. It even carries April 1964 date codes, only weeks away from when my car was built. He left it unpainted (at my request) and even delivered it to me in Northern California for free. (He was making an unrelated trip in this direction anyhow.)
Much of this is going out into the trash today.
With the replacement block secured, I finished the disassembly of the old one. Deep inside the motor was a paradox: the bearings were heavily worn, but the crank was not. The old pistons were relatively clean, but my new camshaft already looked rough and used up.
Most of the bearings were worn down to the copper. This one wasn’t even the worst of the lot.
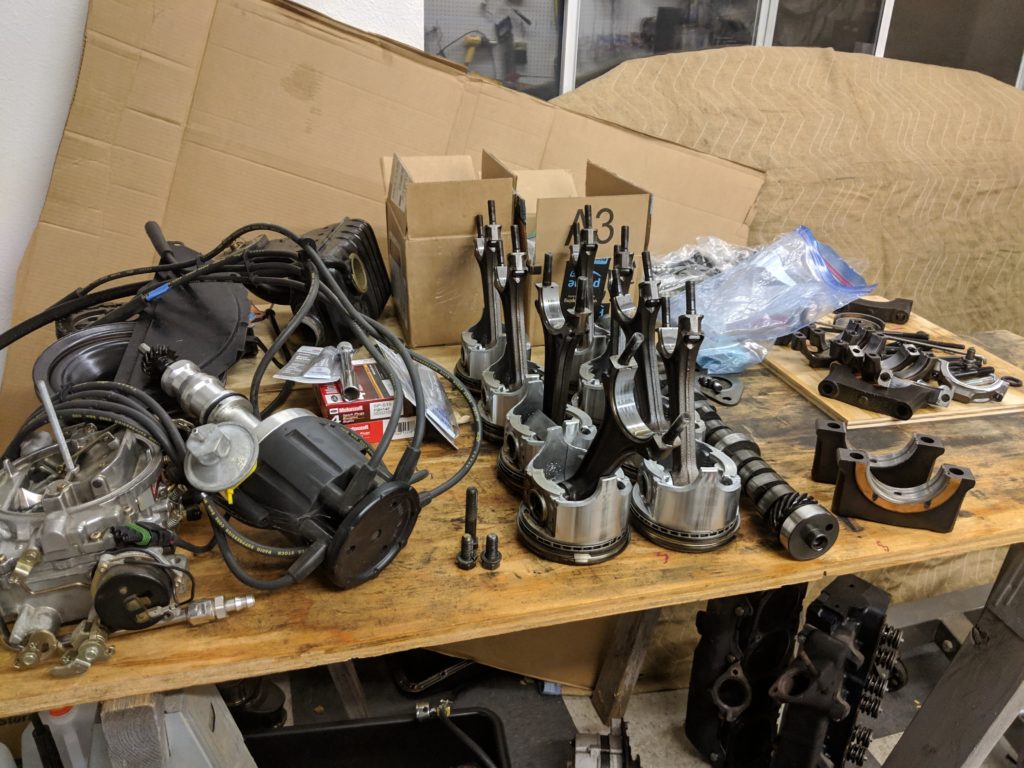
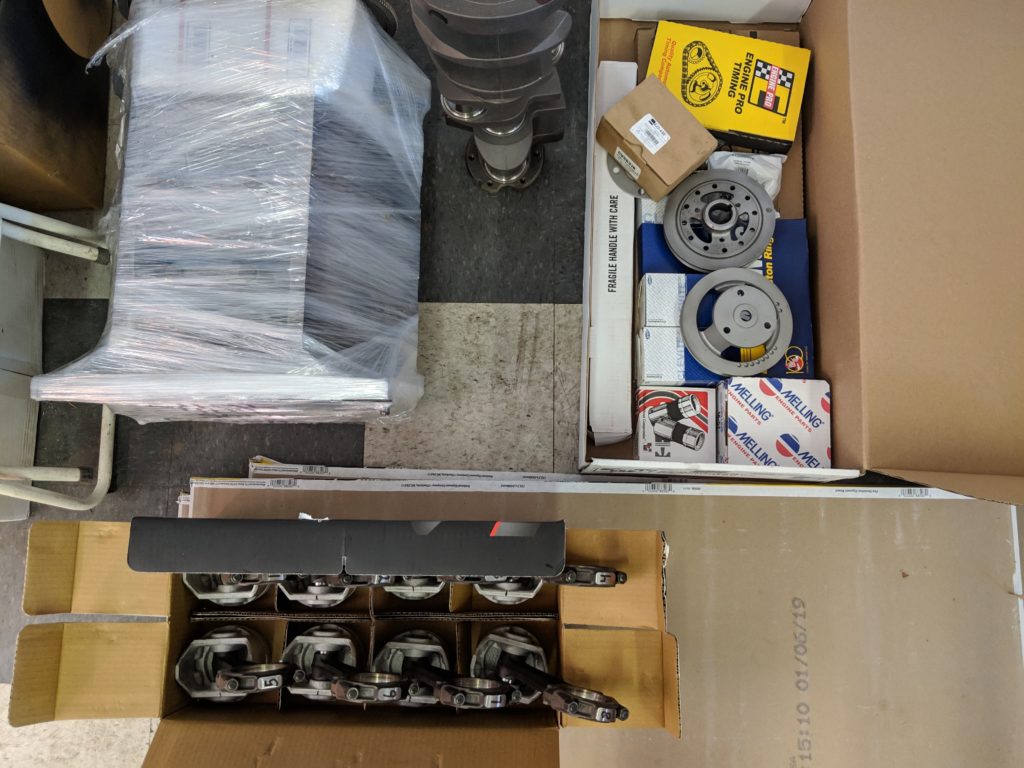
I took the crank down to my machinist and he confirmed that it was ground .020 under but was in otherwise excellent condition. He polished it, ordered a master engine kit (bearings, pistons, gaskets, timing chain, etc.), and balanced the entire rotating assembly, including the flex plate and dampener. (He removed 35 grams(!) from the crank to bring it in balance.)
Everything you need to build a new FE motor, just add labor.
I picked up all the parts this week, so all that’s really left is assembly. Three things are working against me at the moment: rainy weather, a busy work schedule and a bathroom remodel I started about a week ago (which is not only eating up time, but also space: my workshop is full of drywall)
Nonetheless, I hope to have the new block up on the engine stand next week. Assembly of the bottom end should go pretty quick, and getting that done would free up space in the shop (which will no doubt get filled with lumber and flooring materials.)
The car is outside, under cover, to fend of the worst of the rain. Before the engine goes in, I’ll be reworking the worst of the wiring and freshening up the engine bay (again, ug.) The goal is to have the car rolling in late spring.
I found it impossible to make any decision about the future of my ‘Bird without knowing exactly what was wrong. So, last weekend I took a few hours and tore into the motor.
On Saturday, I did the light work, removing accessories, draining the radiator and digging as far down as the rocker shafts. Sunday, my son came down the help with the heavy work: hood, intake manifold and the head itself.
The motor with all the “easy” stuff removed.
Getting the hood off is a coordinated effort involving two people, each using both hands and a shoulder to hold things up while the bolts come off. Once it was safely stored away, we removed the bolts from the intake and chained it to a hoist. It was sealed on pretty well and took a significant amount of force (and just a little prying) before it popped off.
The head gasket looked ok.
We left the exhaust manifold bolted to the head, disconnecting it from the collector pipe instead. The head bolts were all tight. Once they were off, it only took a little persuasion from the hoist to break it free. Up to this point, we hadn’t found any issues, though the oil in the driver’s side valve cover and (to a lesser extent) in the valley was fouled with coolant. There were no obvious cracks in the block and the head gasket was still intact.
The “milkshake” in the valve cover indicating water in the oil.
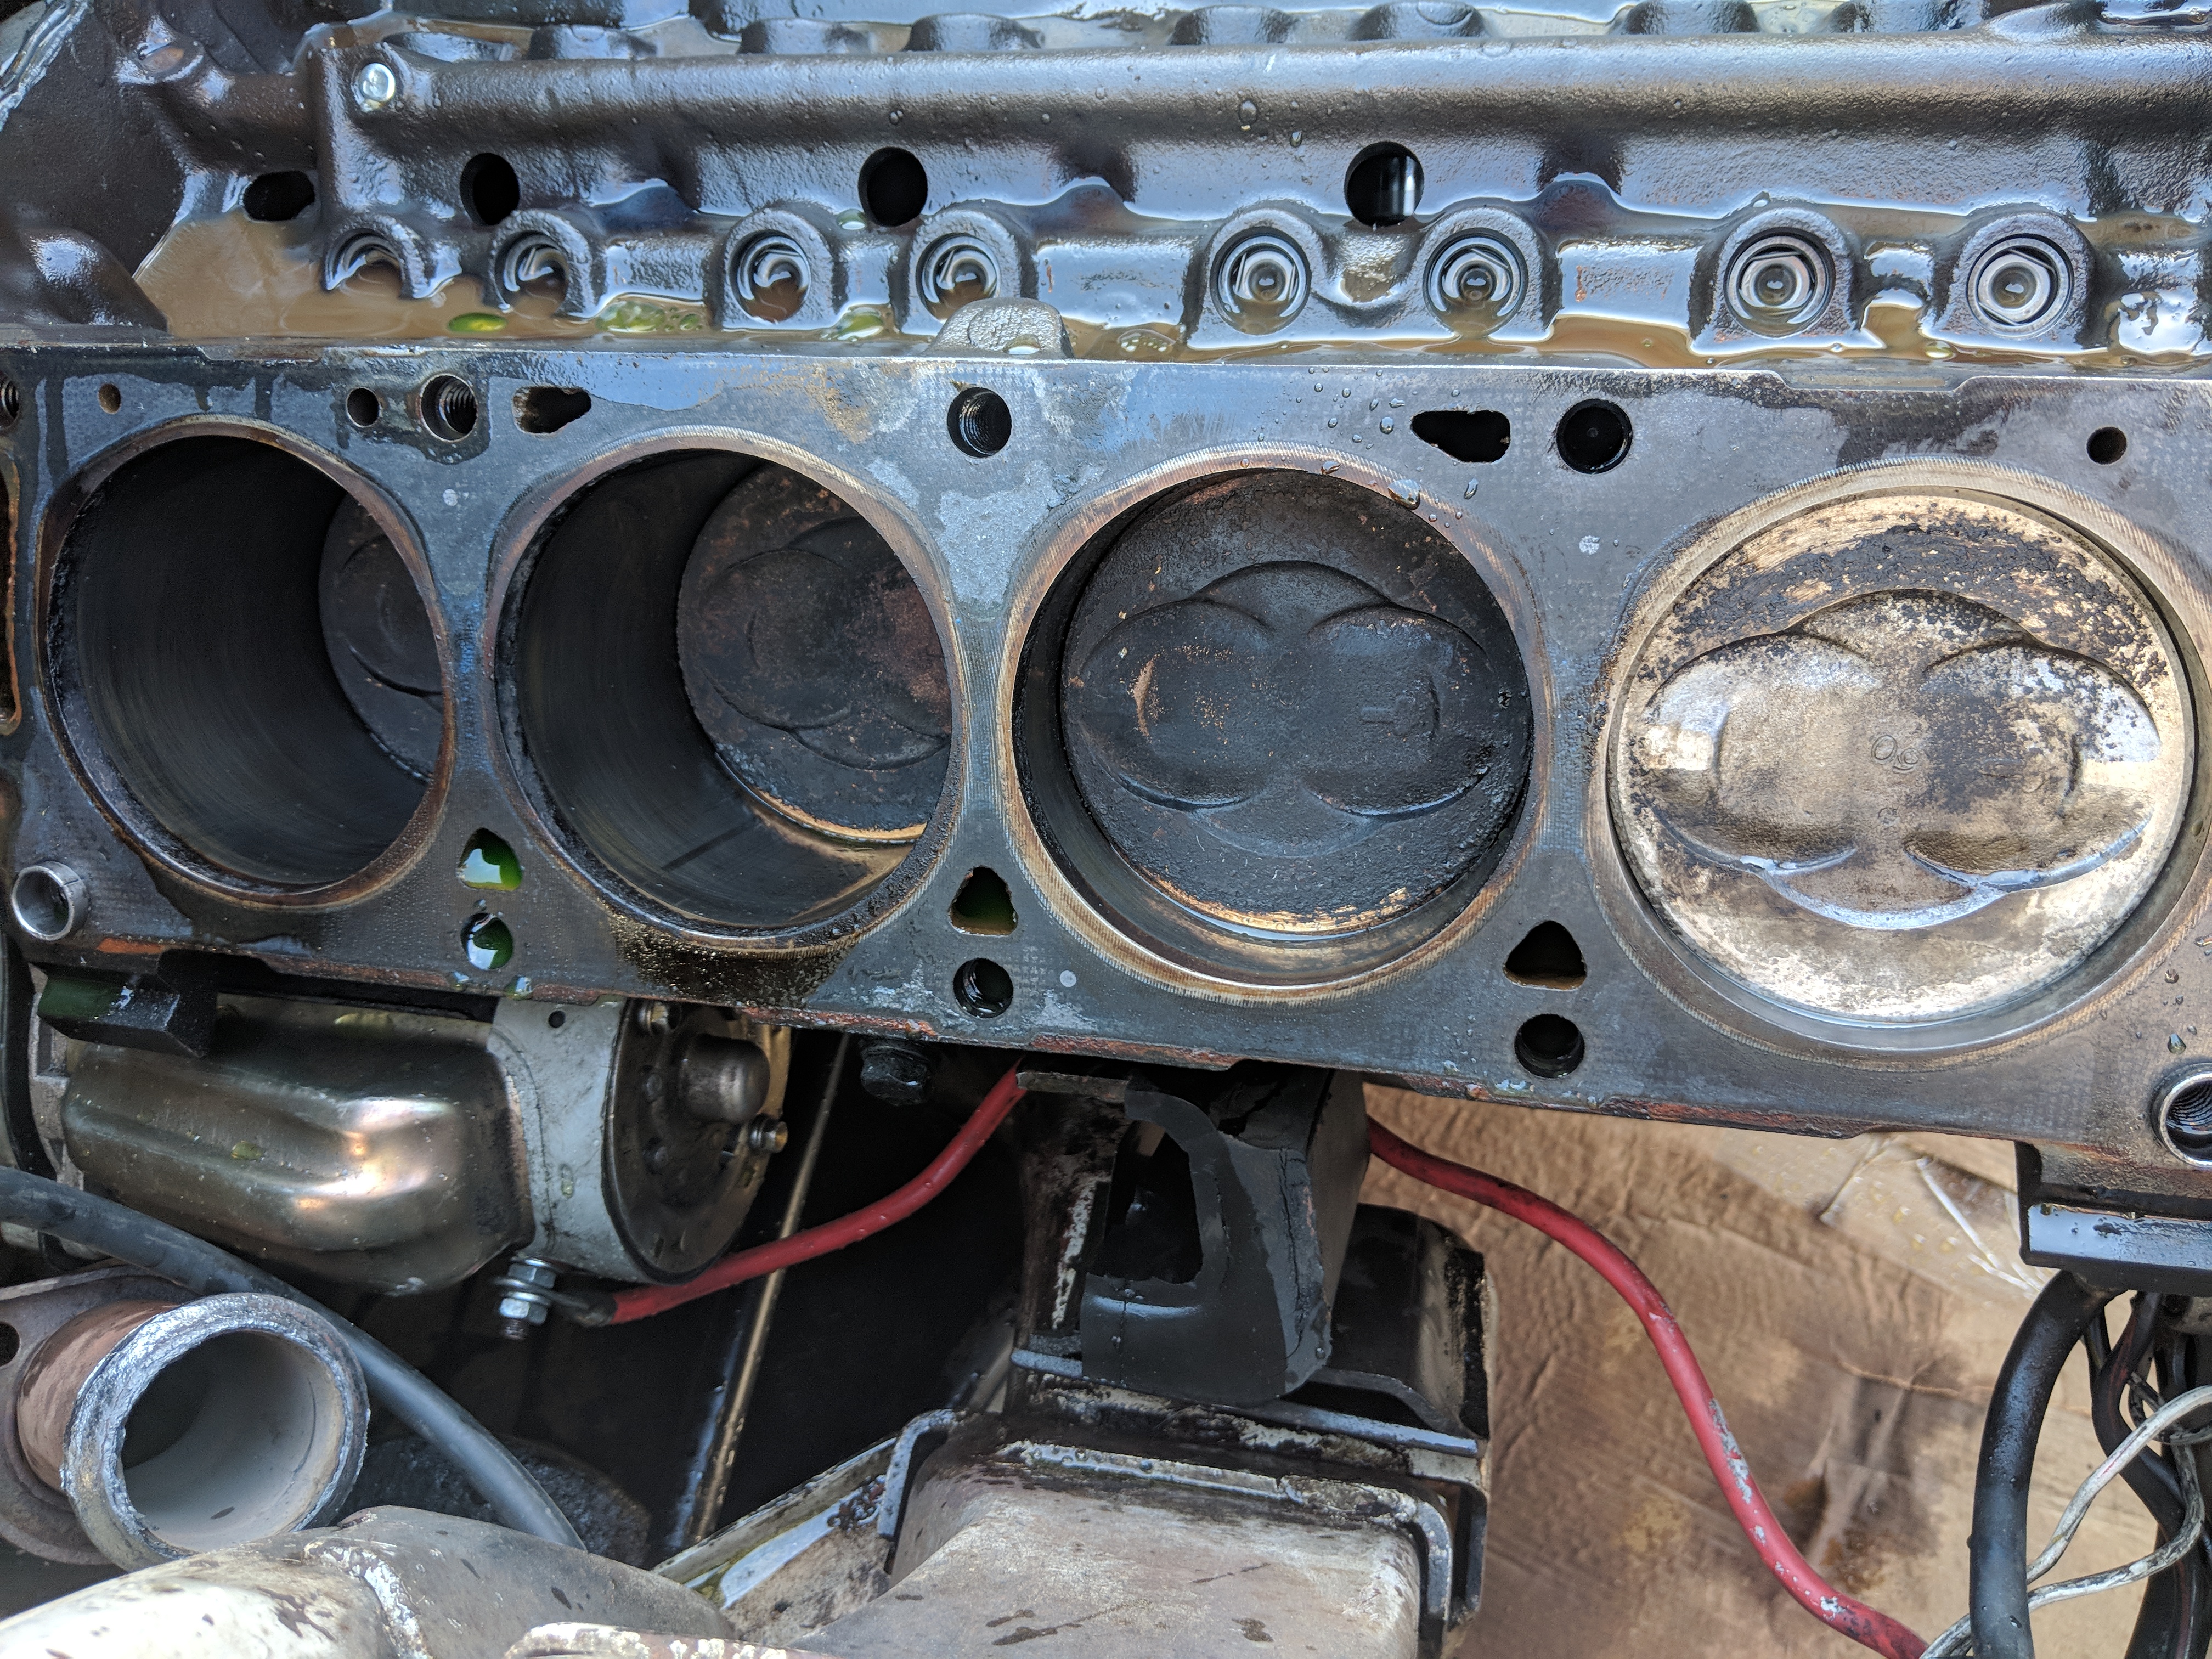
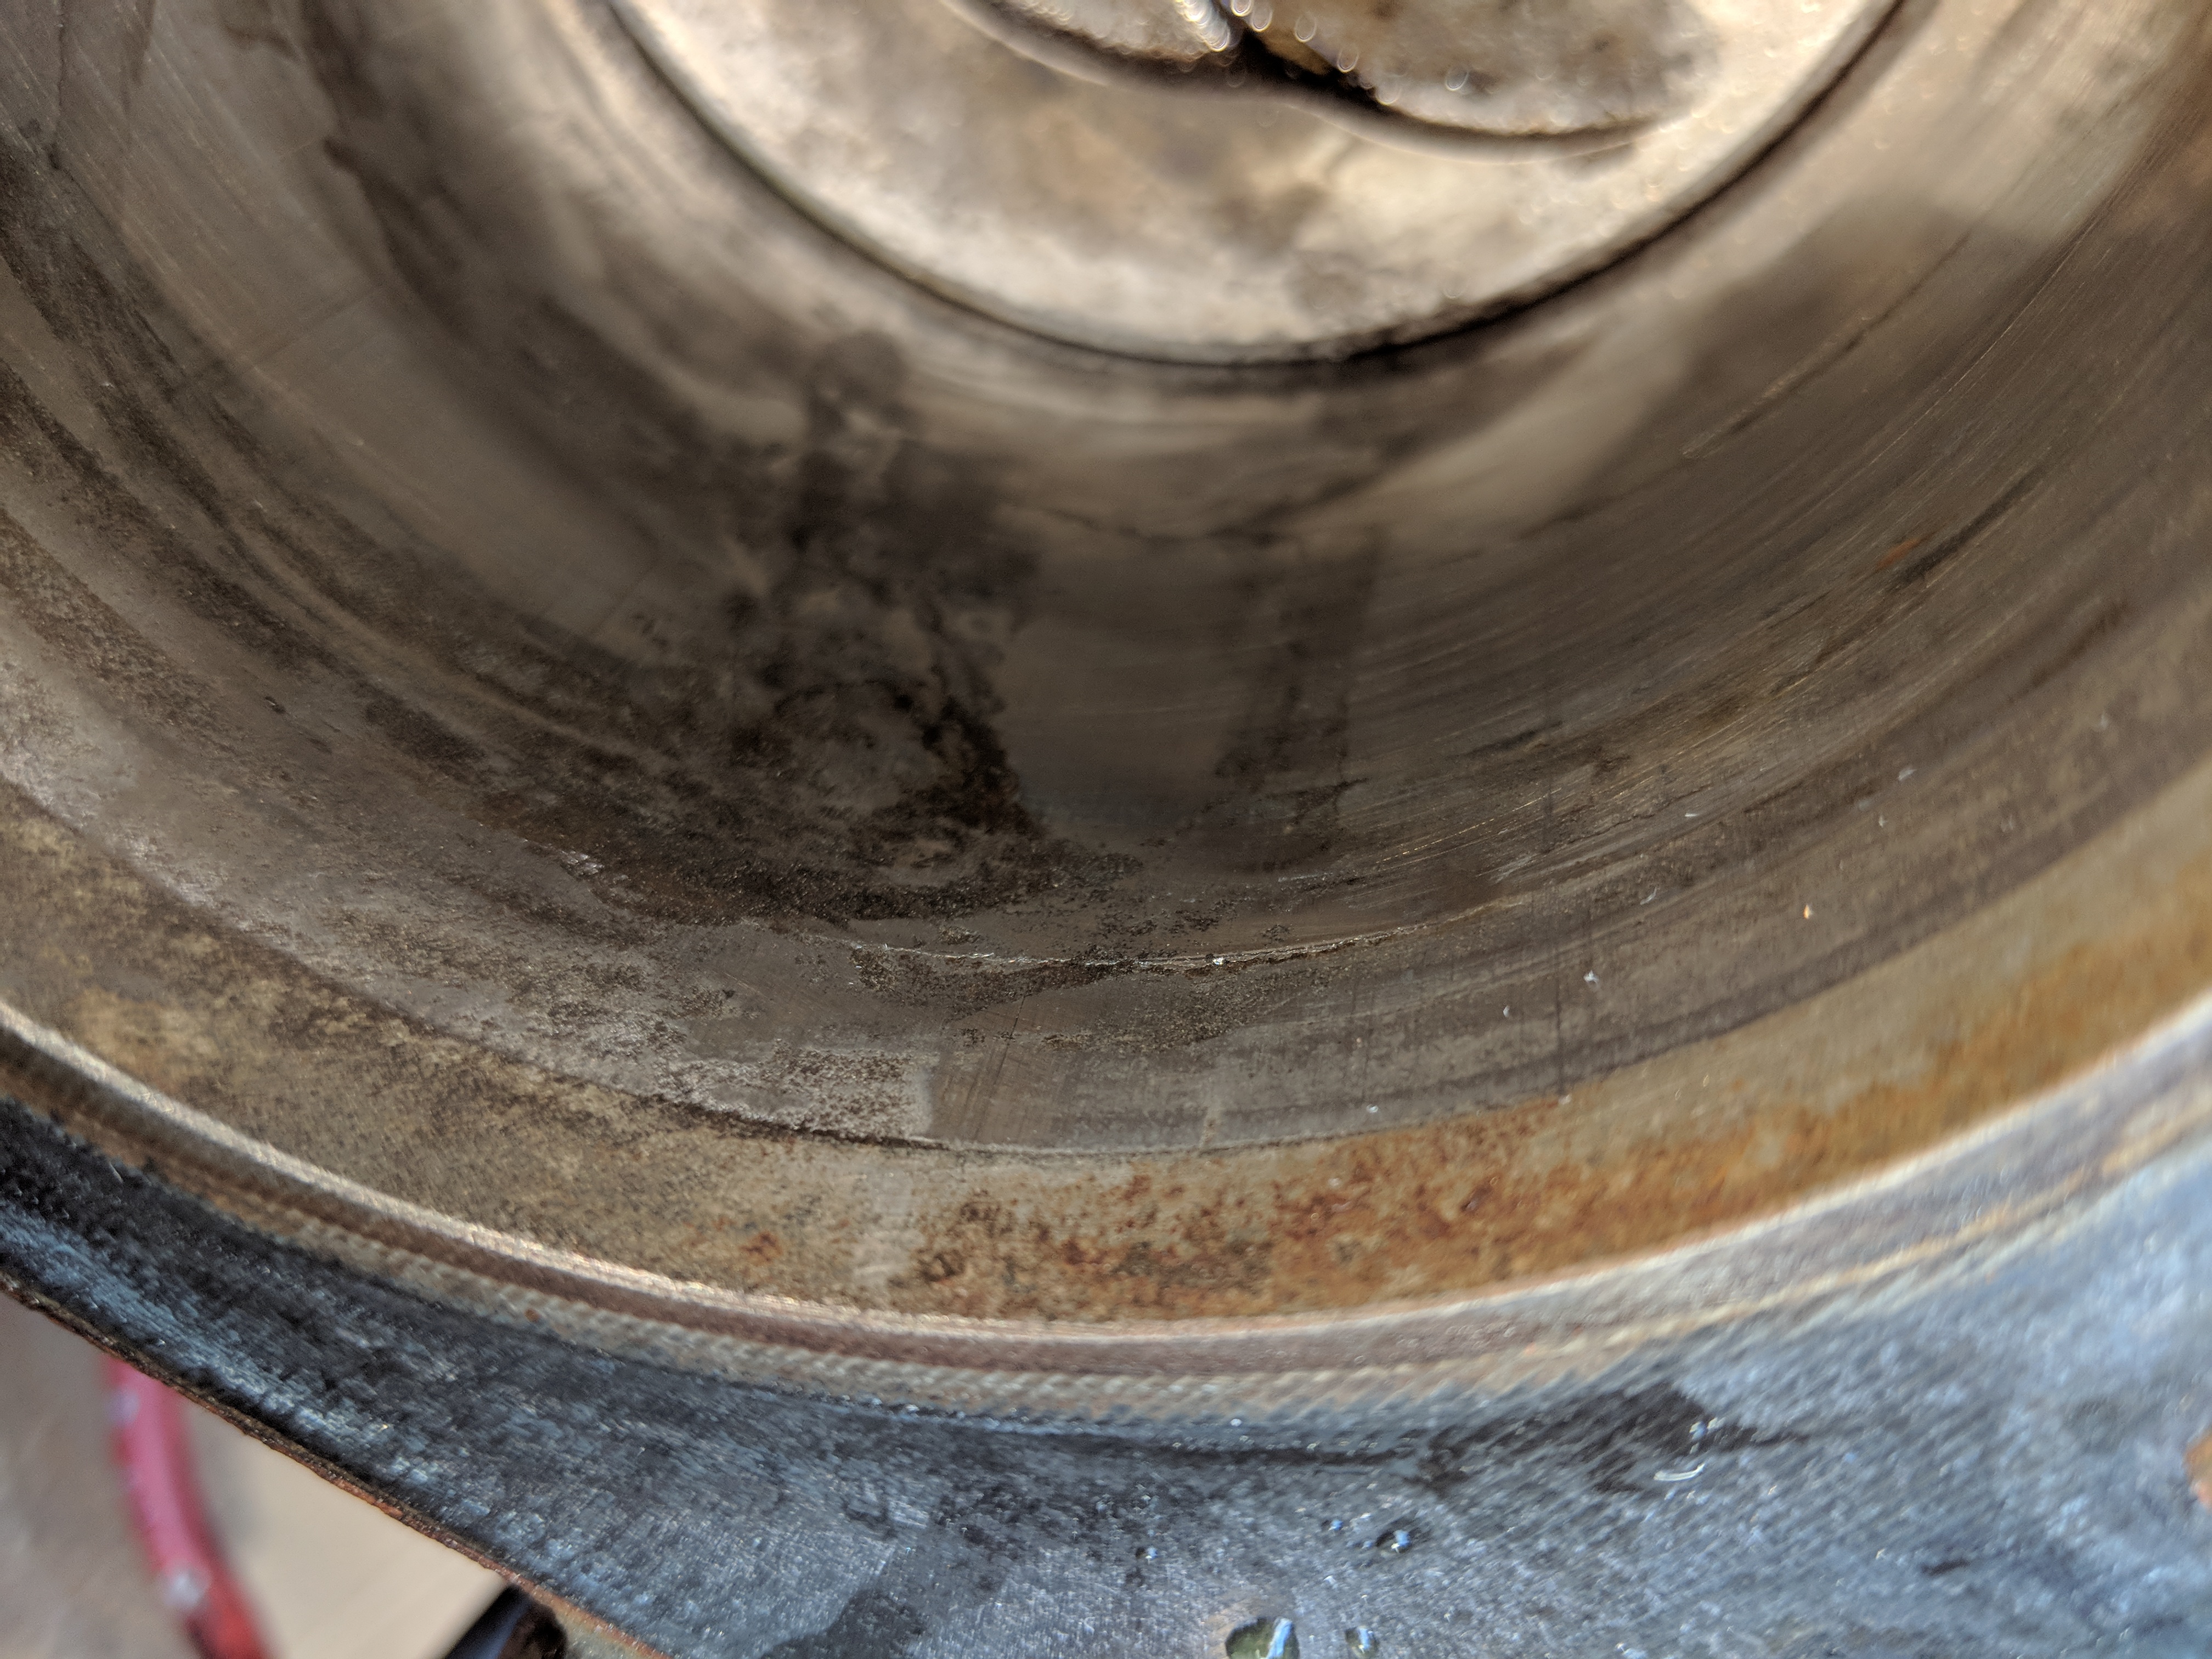
The piston in the bad cylinder was at the top of its stroke, so we had to turn the motor over by hand to move it to the bottom. Once we did, we found an obvious crack about 2 inches long in the cylinder wall. The crack was deep enough to get a fingernail in.
The #1 cylinder was steam cleaned.
This engine will never run again.
The crack is clearly visible. Looks like there’s been some additional damage from the bits of metal floating around in there, too.
In order to get this car back on the road, it’ll need a new motor. A used motor seems like too much of a risk, especially after this experience. Fixing the motor I have–eight new sleeves, clean, magnaflux and install a new rotating assembly–adds up to about $4,000. Buying a pre-built motor (essentially the same thing, but with a different block) is about the same price.
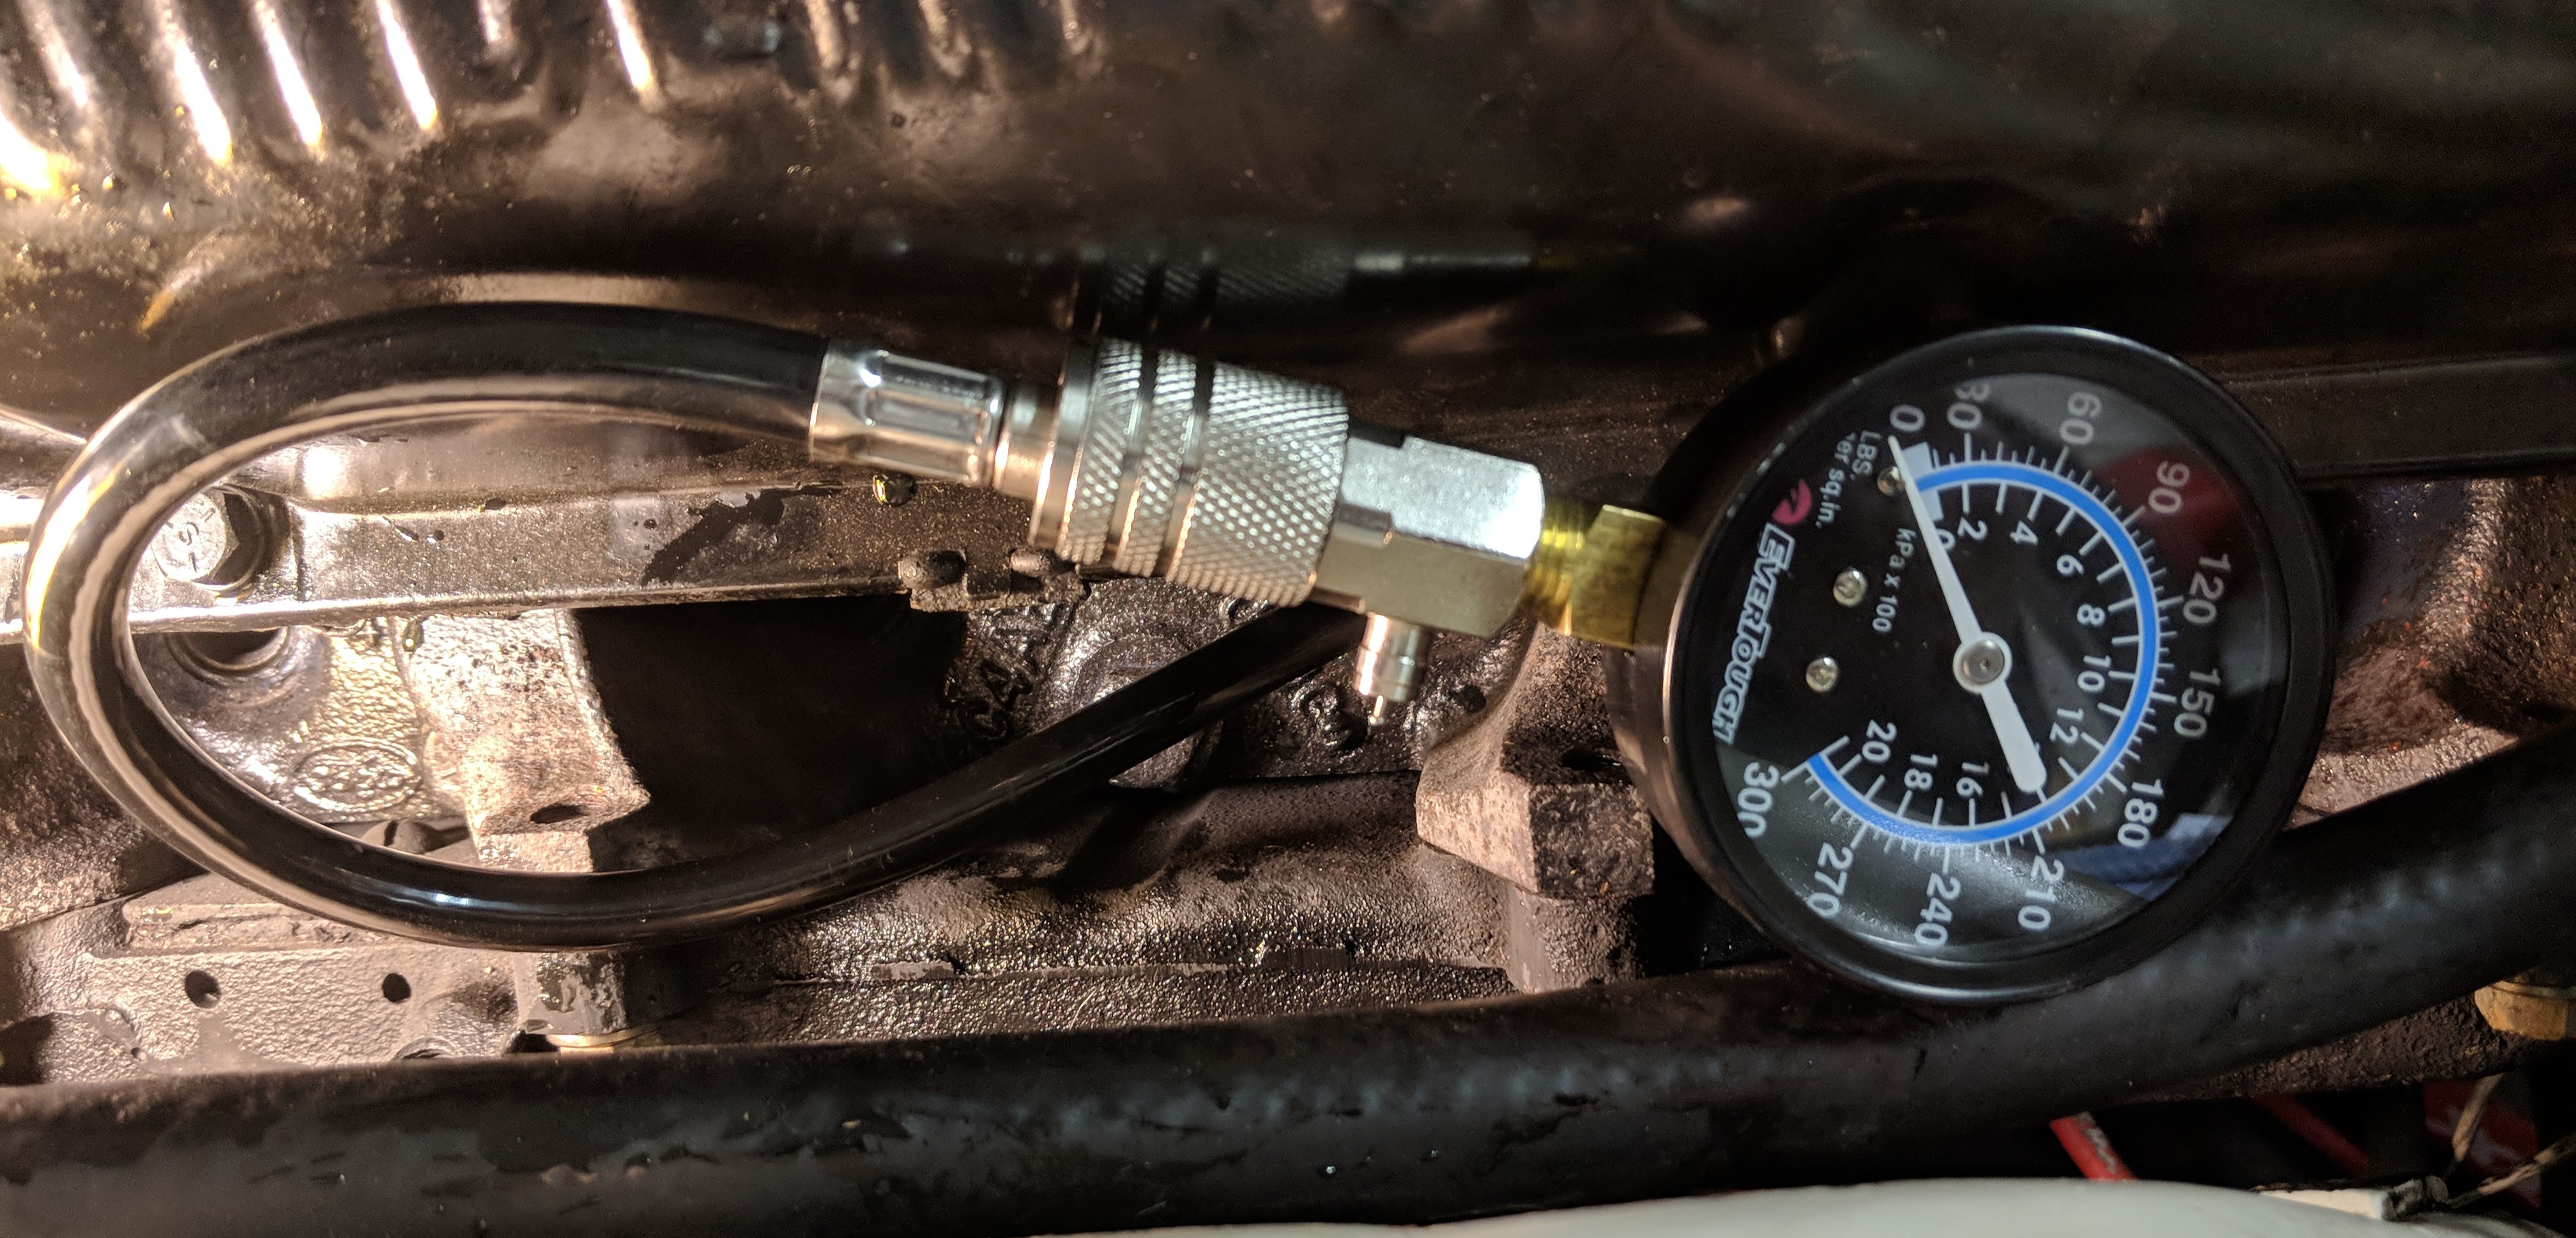
I crawled under the car late yesterday afternoon and reinstalled the starter. After pulling the rest of the plugs (on the driver’s side of the motor) and finding no other surprises, I spun the motor a few times to pump out what I could of the coolant in the #1 cylinder.
That done, I took some quick compression readings on numbers 1 through 4. The coolant-filled cylinder read very high, probably a result of some fluid still in there. The other readings were nominal, in the 70-80 range.
I hate the sound of the motor spinning with no resistance.
On the plus side, there’s no indication of water in the oil. However, in looking back over my blog, there’s some indication that I’ve been mysteriously losing coolant since at least the summer of 2013.
With the coolant mostly purged, I’m pretty sure the car will start. (Heck, I could probably even start it with one plug missing.) If so, I’ll see about moving it outside where I can tear it down. Once I know what I’m really dealing with, I can make some decisions on how to proceed.
I replaced my battery yesterday. Starting, especially hot, was a little labored and after eight years, I figured it was due.
With everything buttoned up and a few shots of starting fluid in the carb, I turned the key. After a few seconds, it sounded like she was about to grab. Instead, there was a bang and everything stopped turning.
I tried the key a couple more times, but the starter would only strain. I could see the fan move slightly, then bounce back when the key was off.
Today, I pulled the starter. It was a little worn, with a few teeth chipped, but it otherwise appeared sound. At first, I assumed something inside it had jammed; I figured I could replace it and hope for the best.
Before making a run to the auto parts store, I thought to pull the spark plugs and turn the motor over by hand–just to be sure. When I pulled the plug for the #1 cylinder, it came out wet. At first, I thought it was oil fouled, but the liquid was coolant. And the cylinder was completely full of it.
The last time I drove the car, in February, I put about a gallon and a half of coolant in it before starting. It ran fine. Apparently, though, the early warning signs were there.
An internet search didn’t turn up much for “coolant in cylinder,” but what I found suggests a cracked block, a fatal condition. I’ll have to give the future of this car some thought, but today it certainly feels like the end of a chapter.
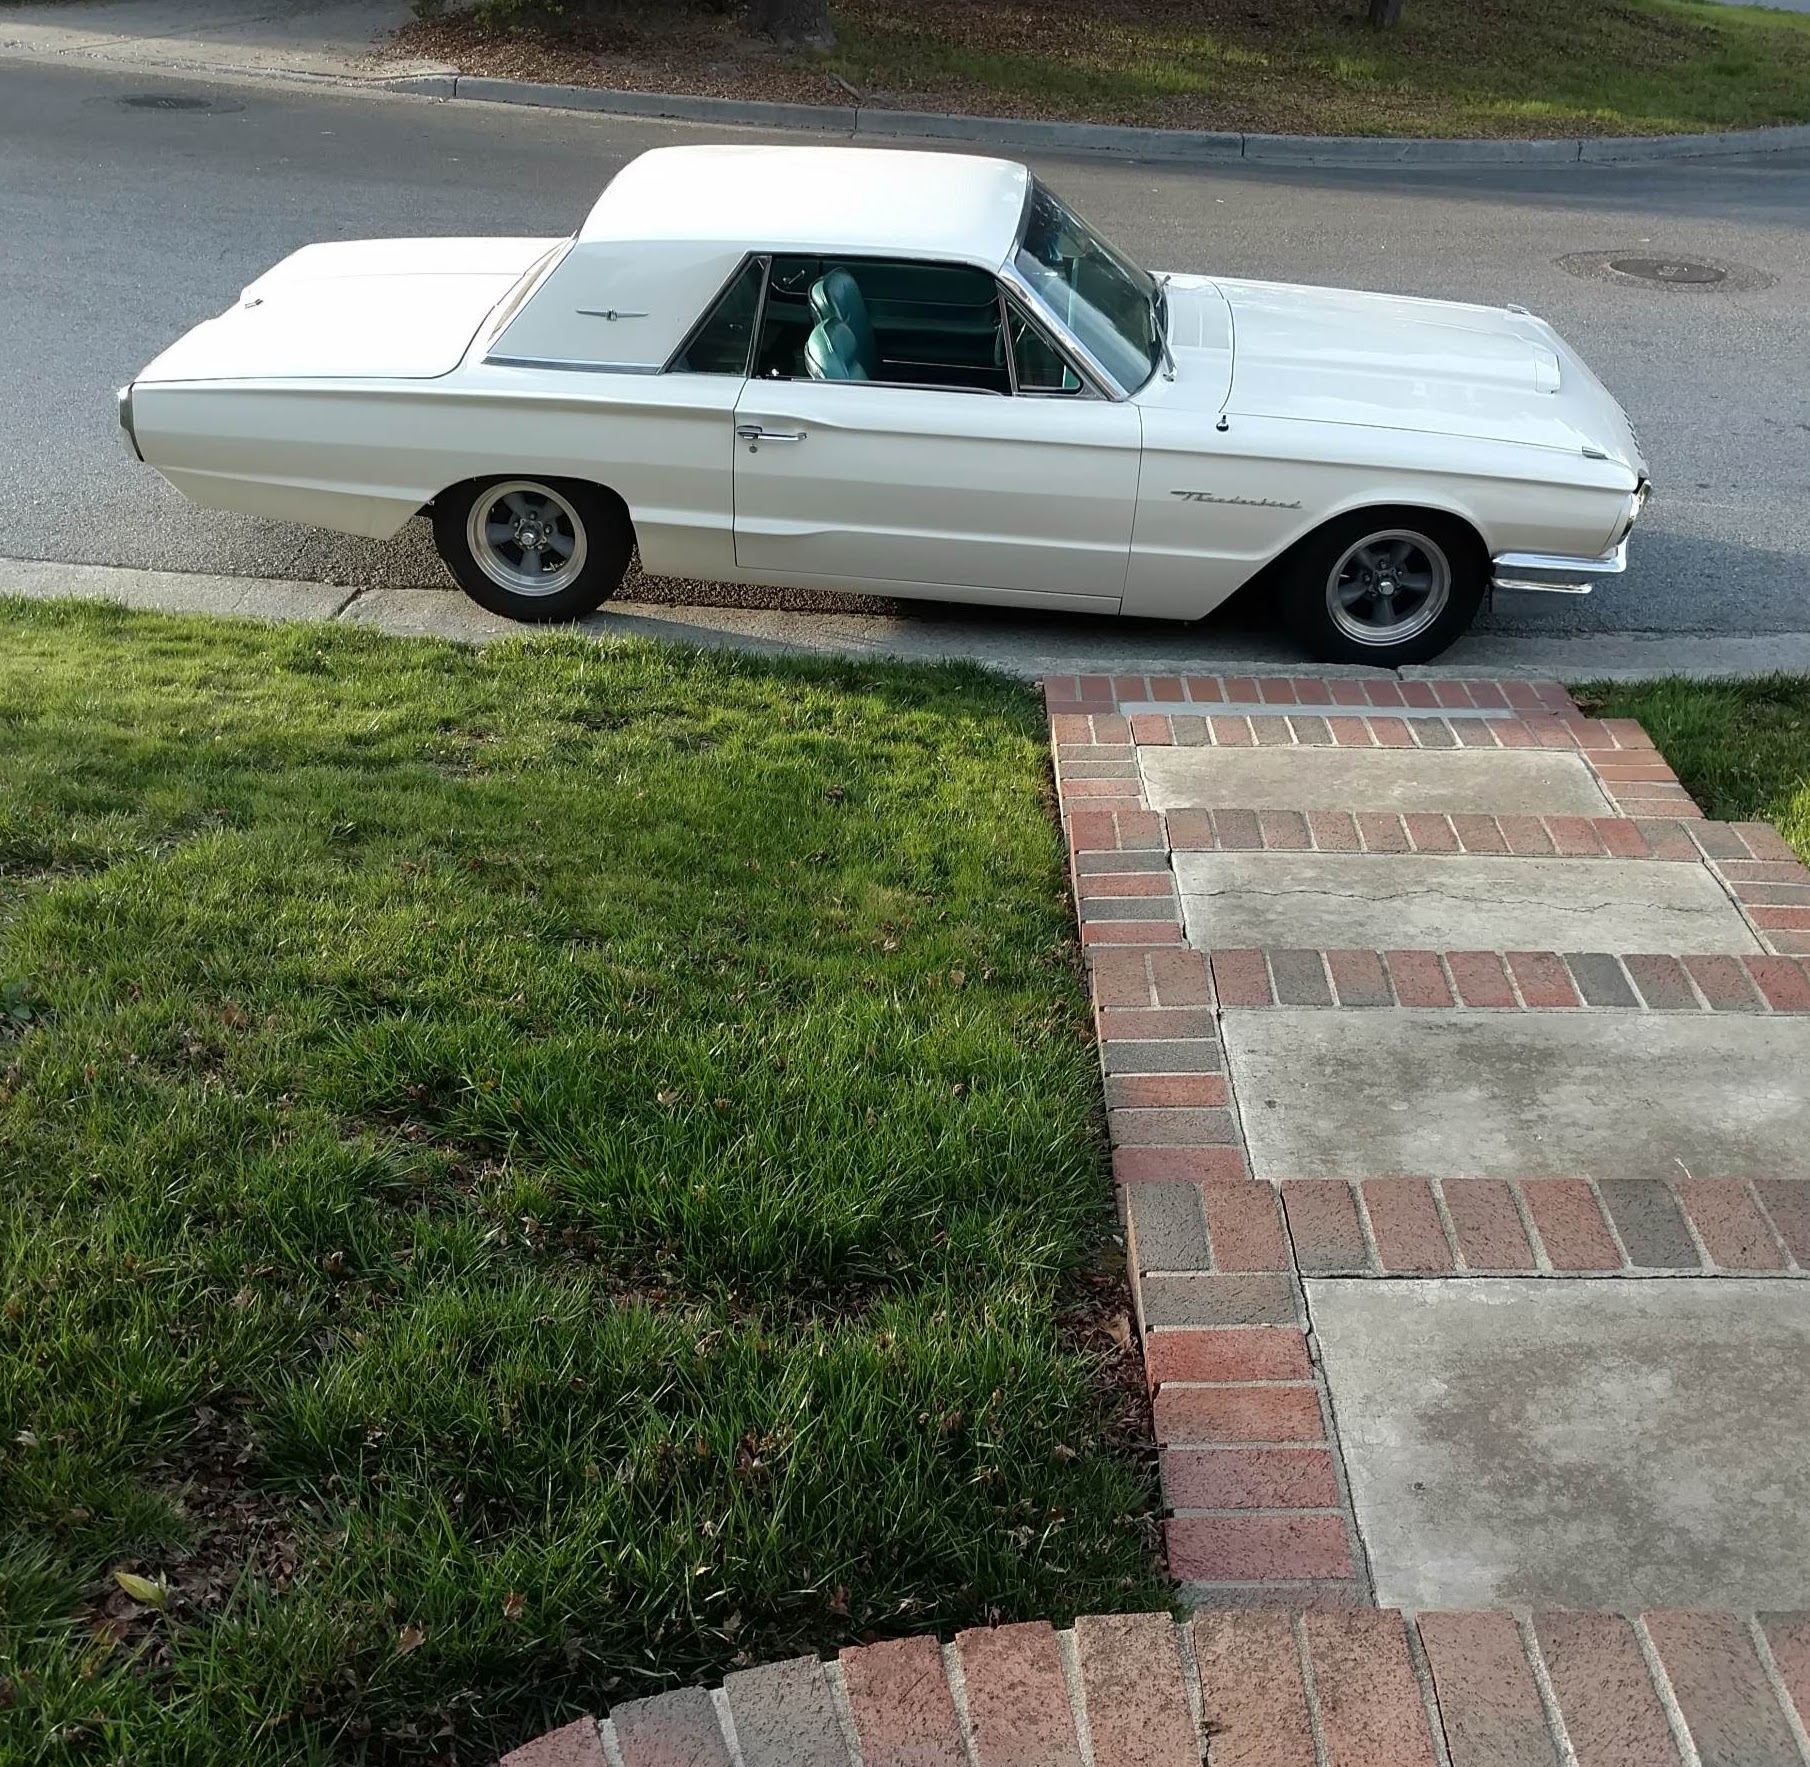
I pulled the Thunderbird out of storage yesterday.
I have to confess, it wasn’t a strong desire to get behind the wheel that motivated me, but a need to get at my shop hoist, trapped behind the car. As it turns out, there really wasn’t much needed to get the car back into running shape even though I’d let it sit for six months.
I never did find the horn brush that vanished, but I did pick up another one (and put it in a safe place). The steering wheel was still loose on the shaft, so it was a simple matter to pull it, install the brush and secure it back in place. The horn still didn’t work—I suspect I’ve got the connection crossed in the harness at the base of the column. The turn signals, running lights and brake lights are are working properly, though.
Super glue for the mirror. Nice to do a job that doesn’t require crawling on the floor or stooped over the fender.
I also re-glued the rearview mirror button to the windshield, I think for the fifth time now. This time I scuffed up both the glass and the button before securing it with thick super glue and some activator.
Last, I topped off the coolant. The system took about a gallon and a half of the stuff, so I think I need to check for a small leak.
I had the battery on a trickle charge; the motor fired up on the second try. So, I got to the hoist pretty easily. Also, it was date night, so we turned a few heads cruising downtown for dinner and drinks.
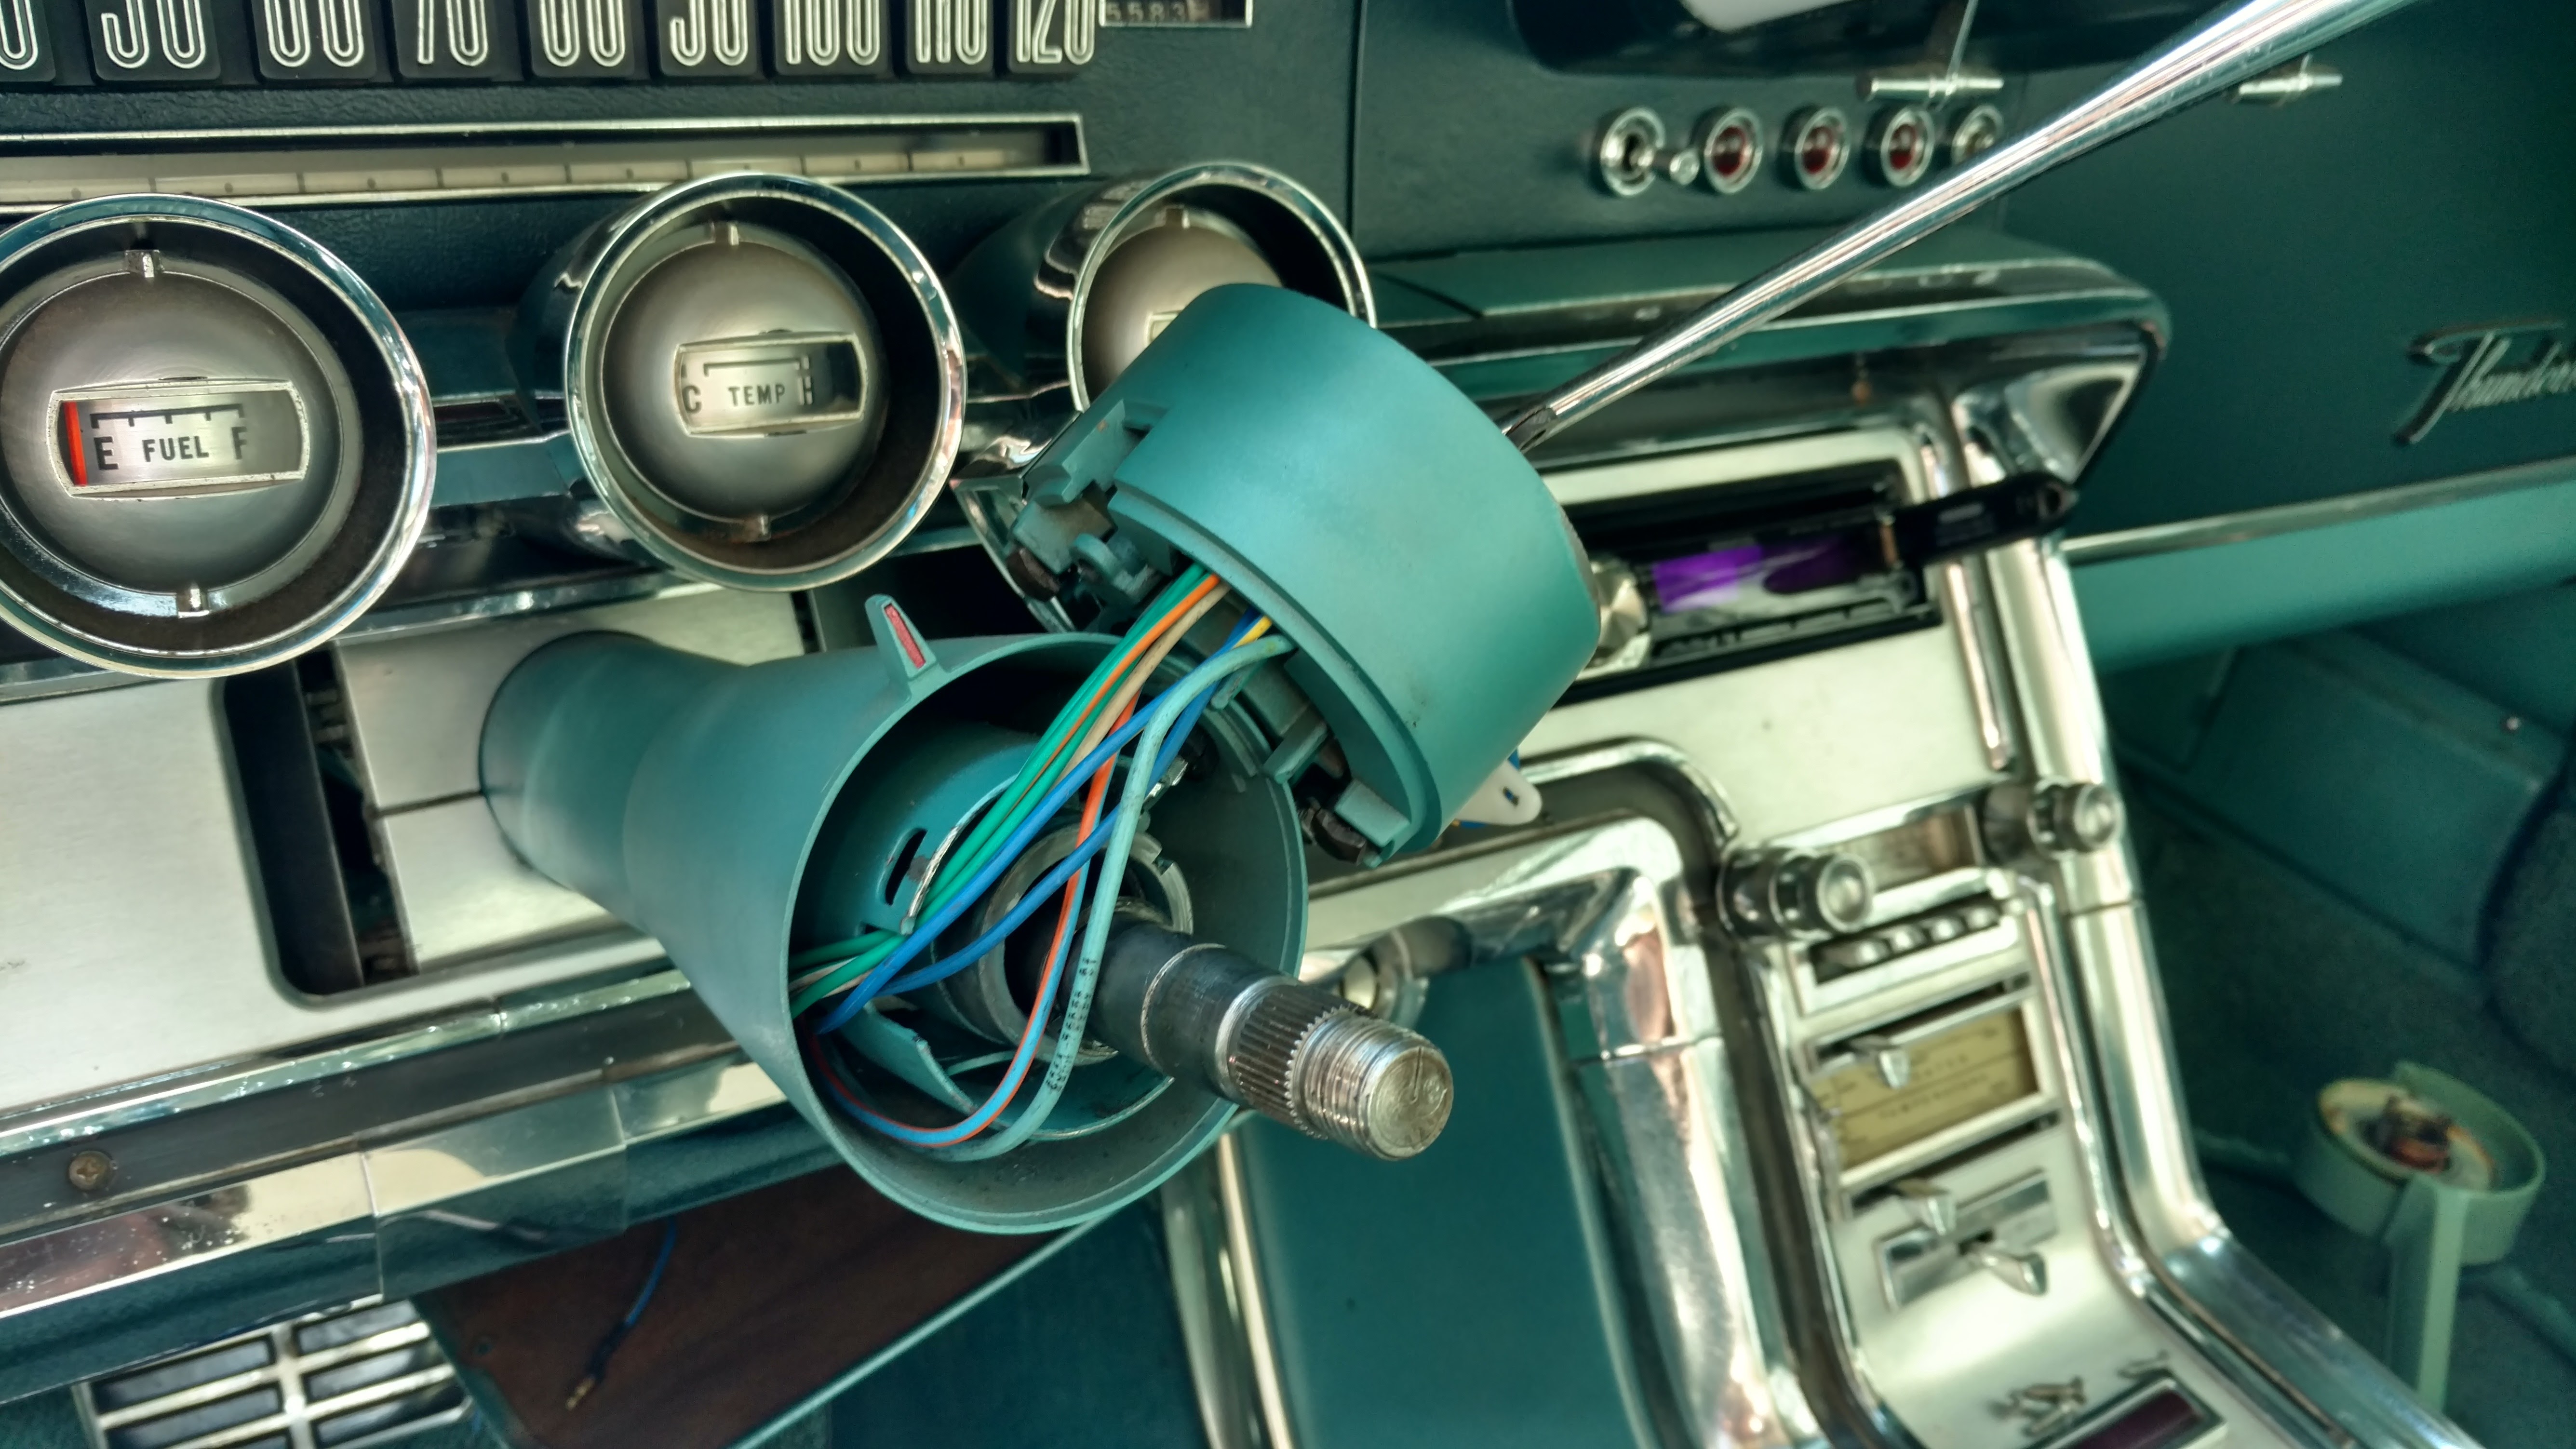
There’s trouble with summertime work on the Thunderbird. Outside, there’s room to work, but no shade from the intense California heat. In the garage, it’s nice and cool, but I can barely move around the car, let alone open a door wide enough to crawl under the dash. To get the turn signal switch swapped out, I stored the car outside, under a cover, reserving the last few (cooler) hours of the day to do what I could. The job took longer that way, but it was a lot more comfortable.
I thought I was brilliant, hanging the collar on the shift lever like that, until the wires pulled back through when I tried to slip it off.
I was able to locate the aftermarket turn signal switch I used a few years back (but not the wiring diagram that came with it). The old switch came out pretty easily, especially once I made the decision to simply cut the bullet connectors off before pulling the wires through the column. A wire in the switch had clearly failed, so I knew I was on the right track.
In the coming years, I expect more wiring failures like this.
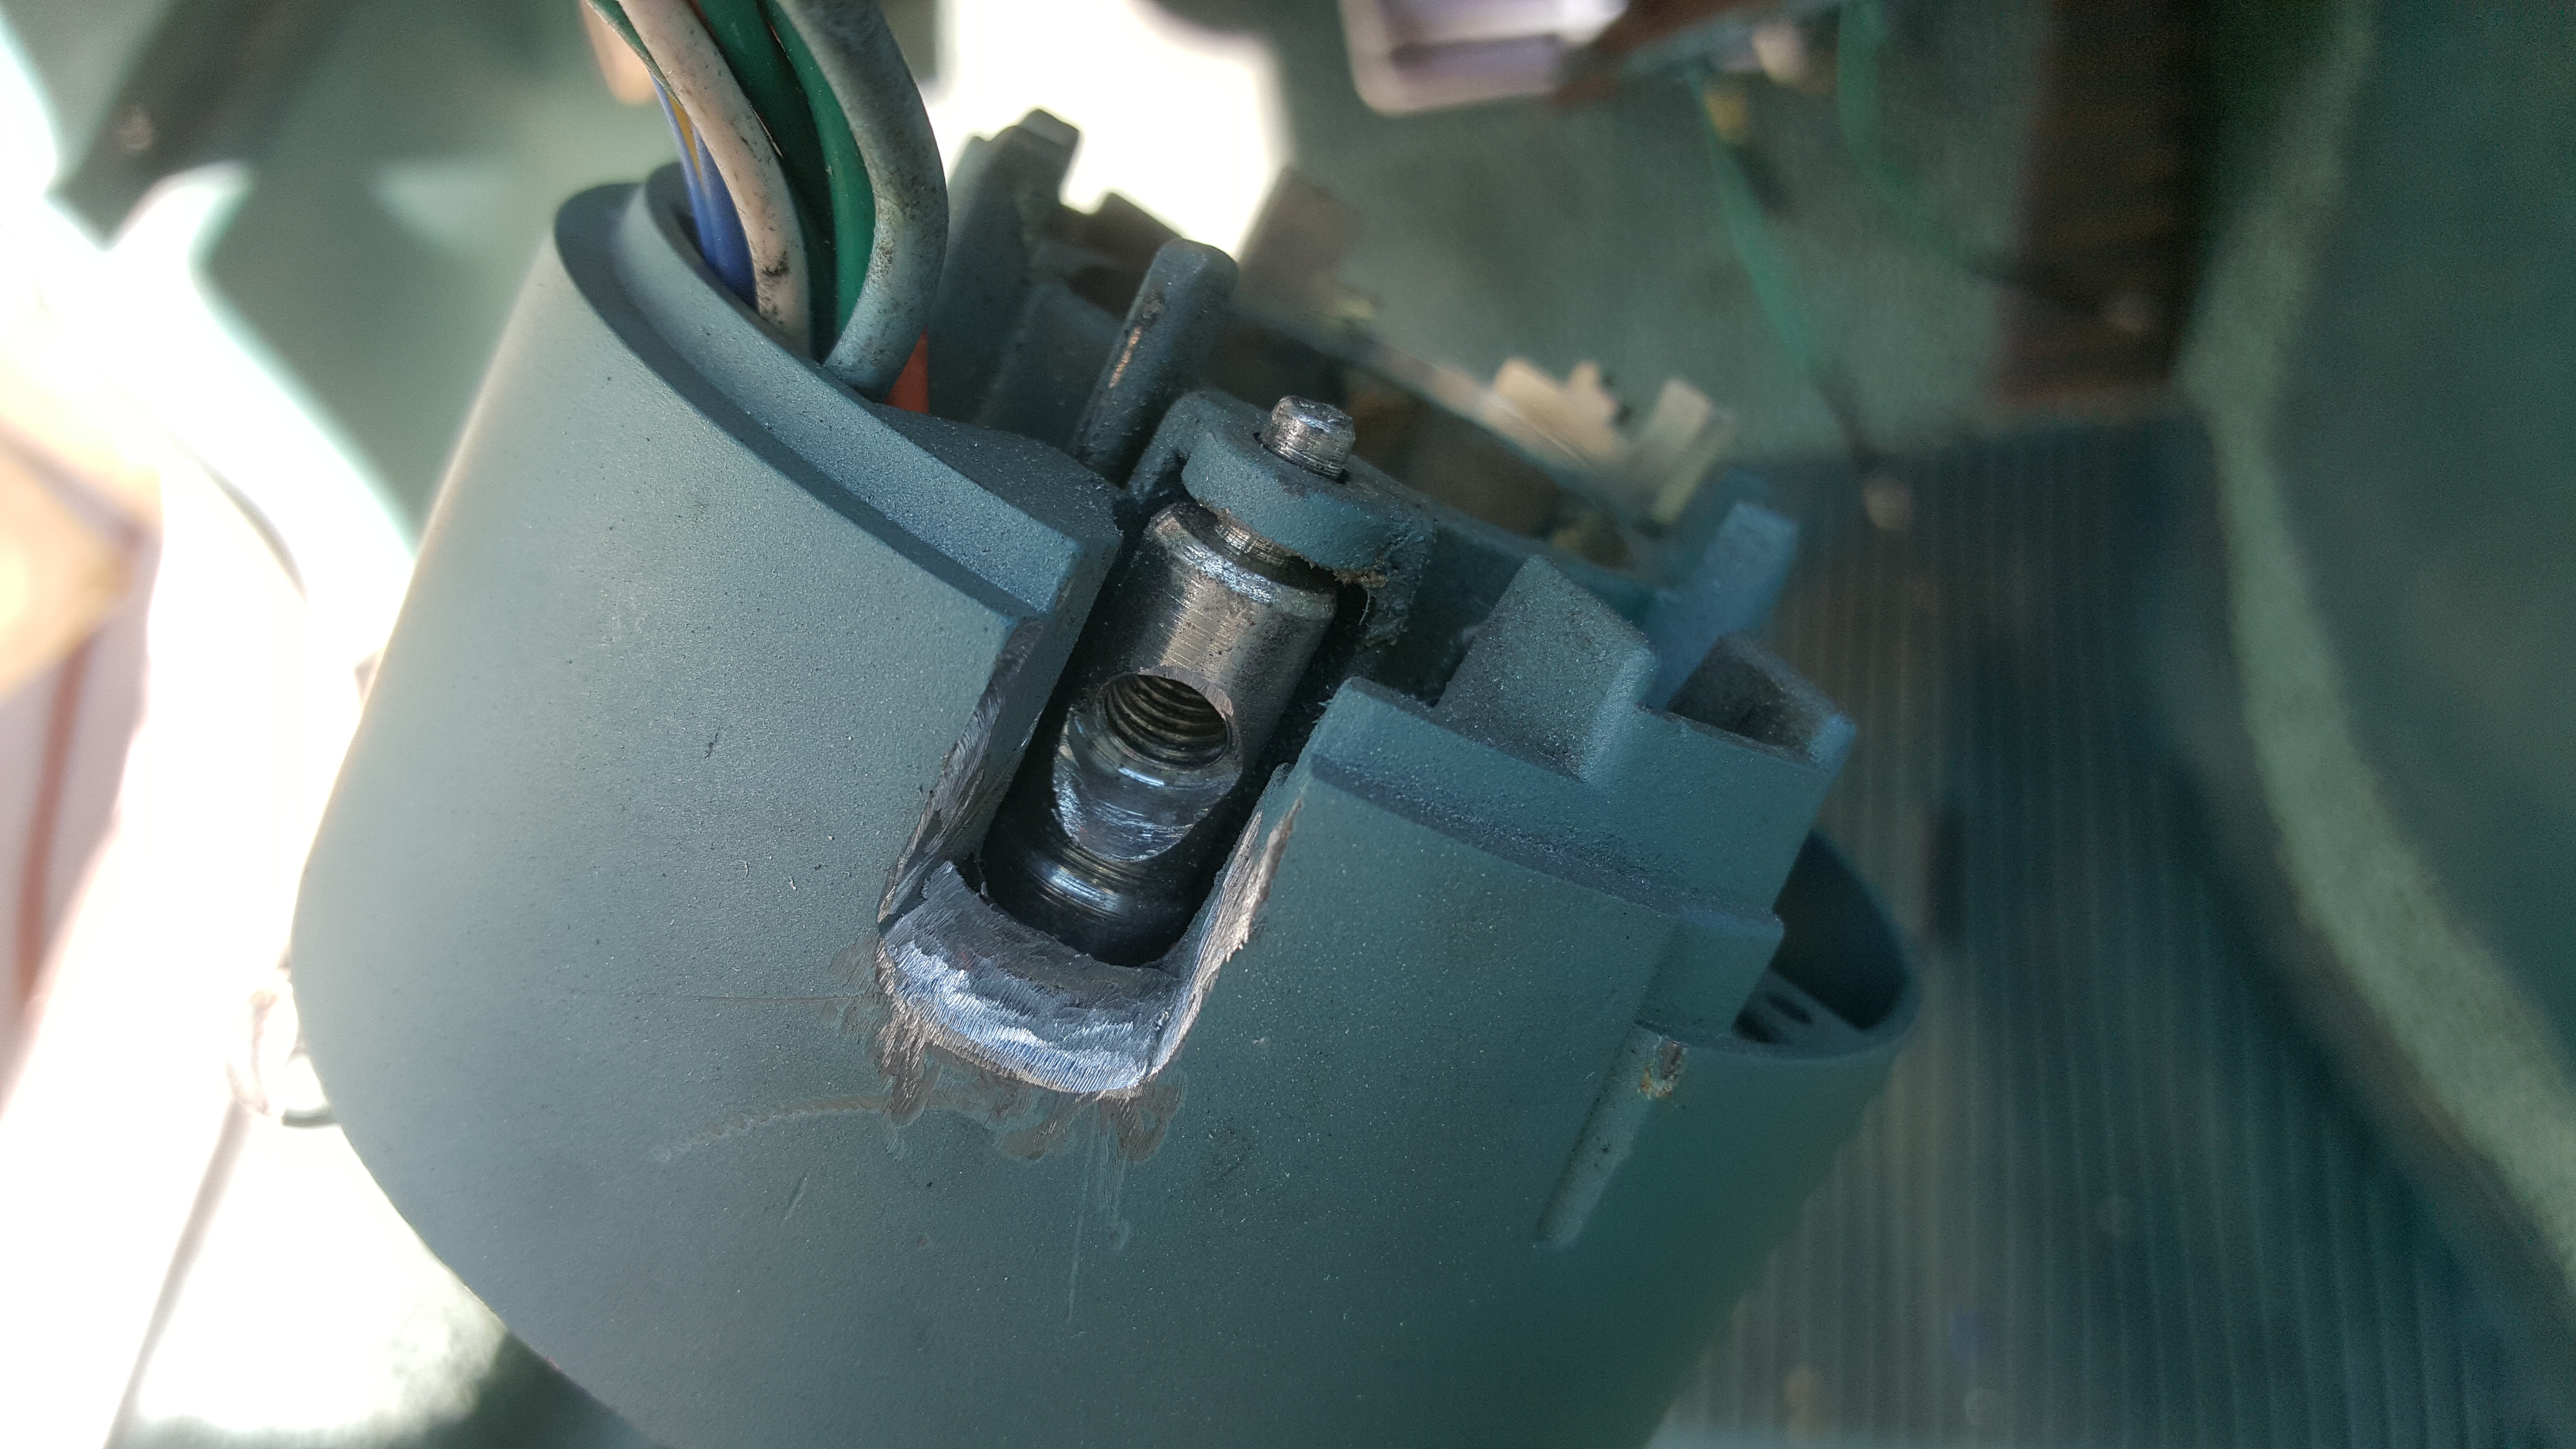
I had to remove the collar to thread the wires for the new switch. That done and attempting to mount it in place, I was reminded of the repop switch’s shortcomings: the mounting plate has to be ground down to fit, as did the steering collar where the turn signal stalk exits (the new switch holds the stalk at the wrong angle), and the self-canceling nylon arms catch on the trigger in the wheel with even the slightest turn—click, click, click, click.
This was the worst part of the job, grinding the original collar to make up for the poor design of the replacement switch. I still have some sanding and painting to do here.
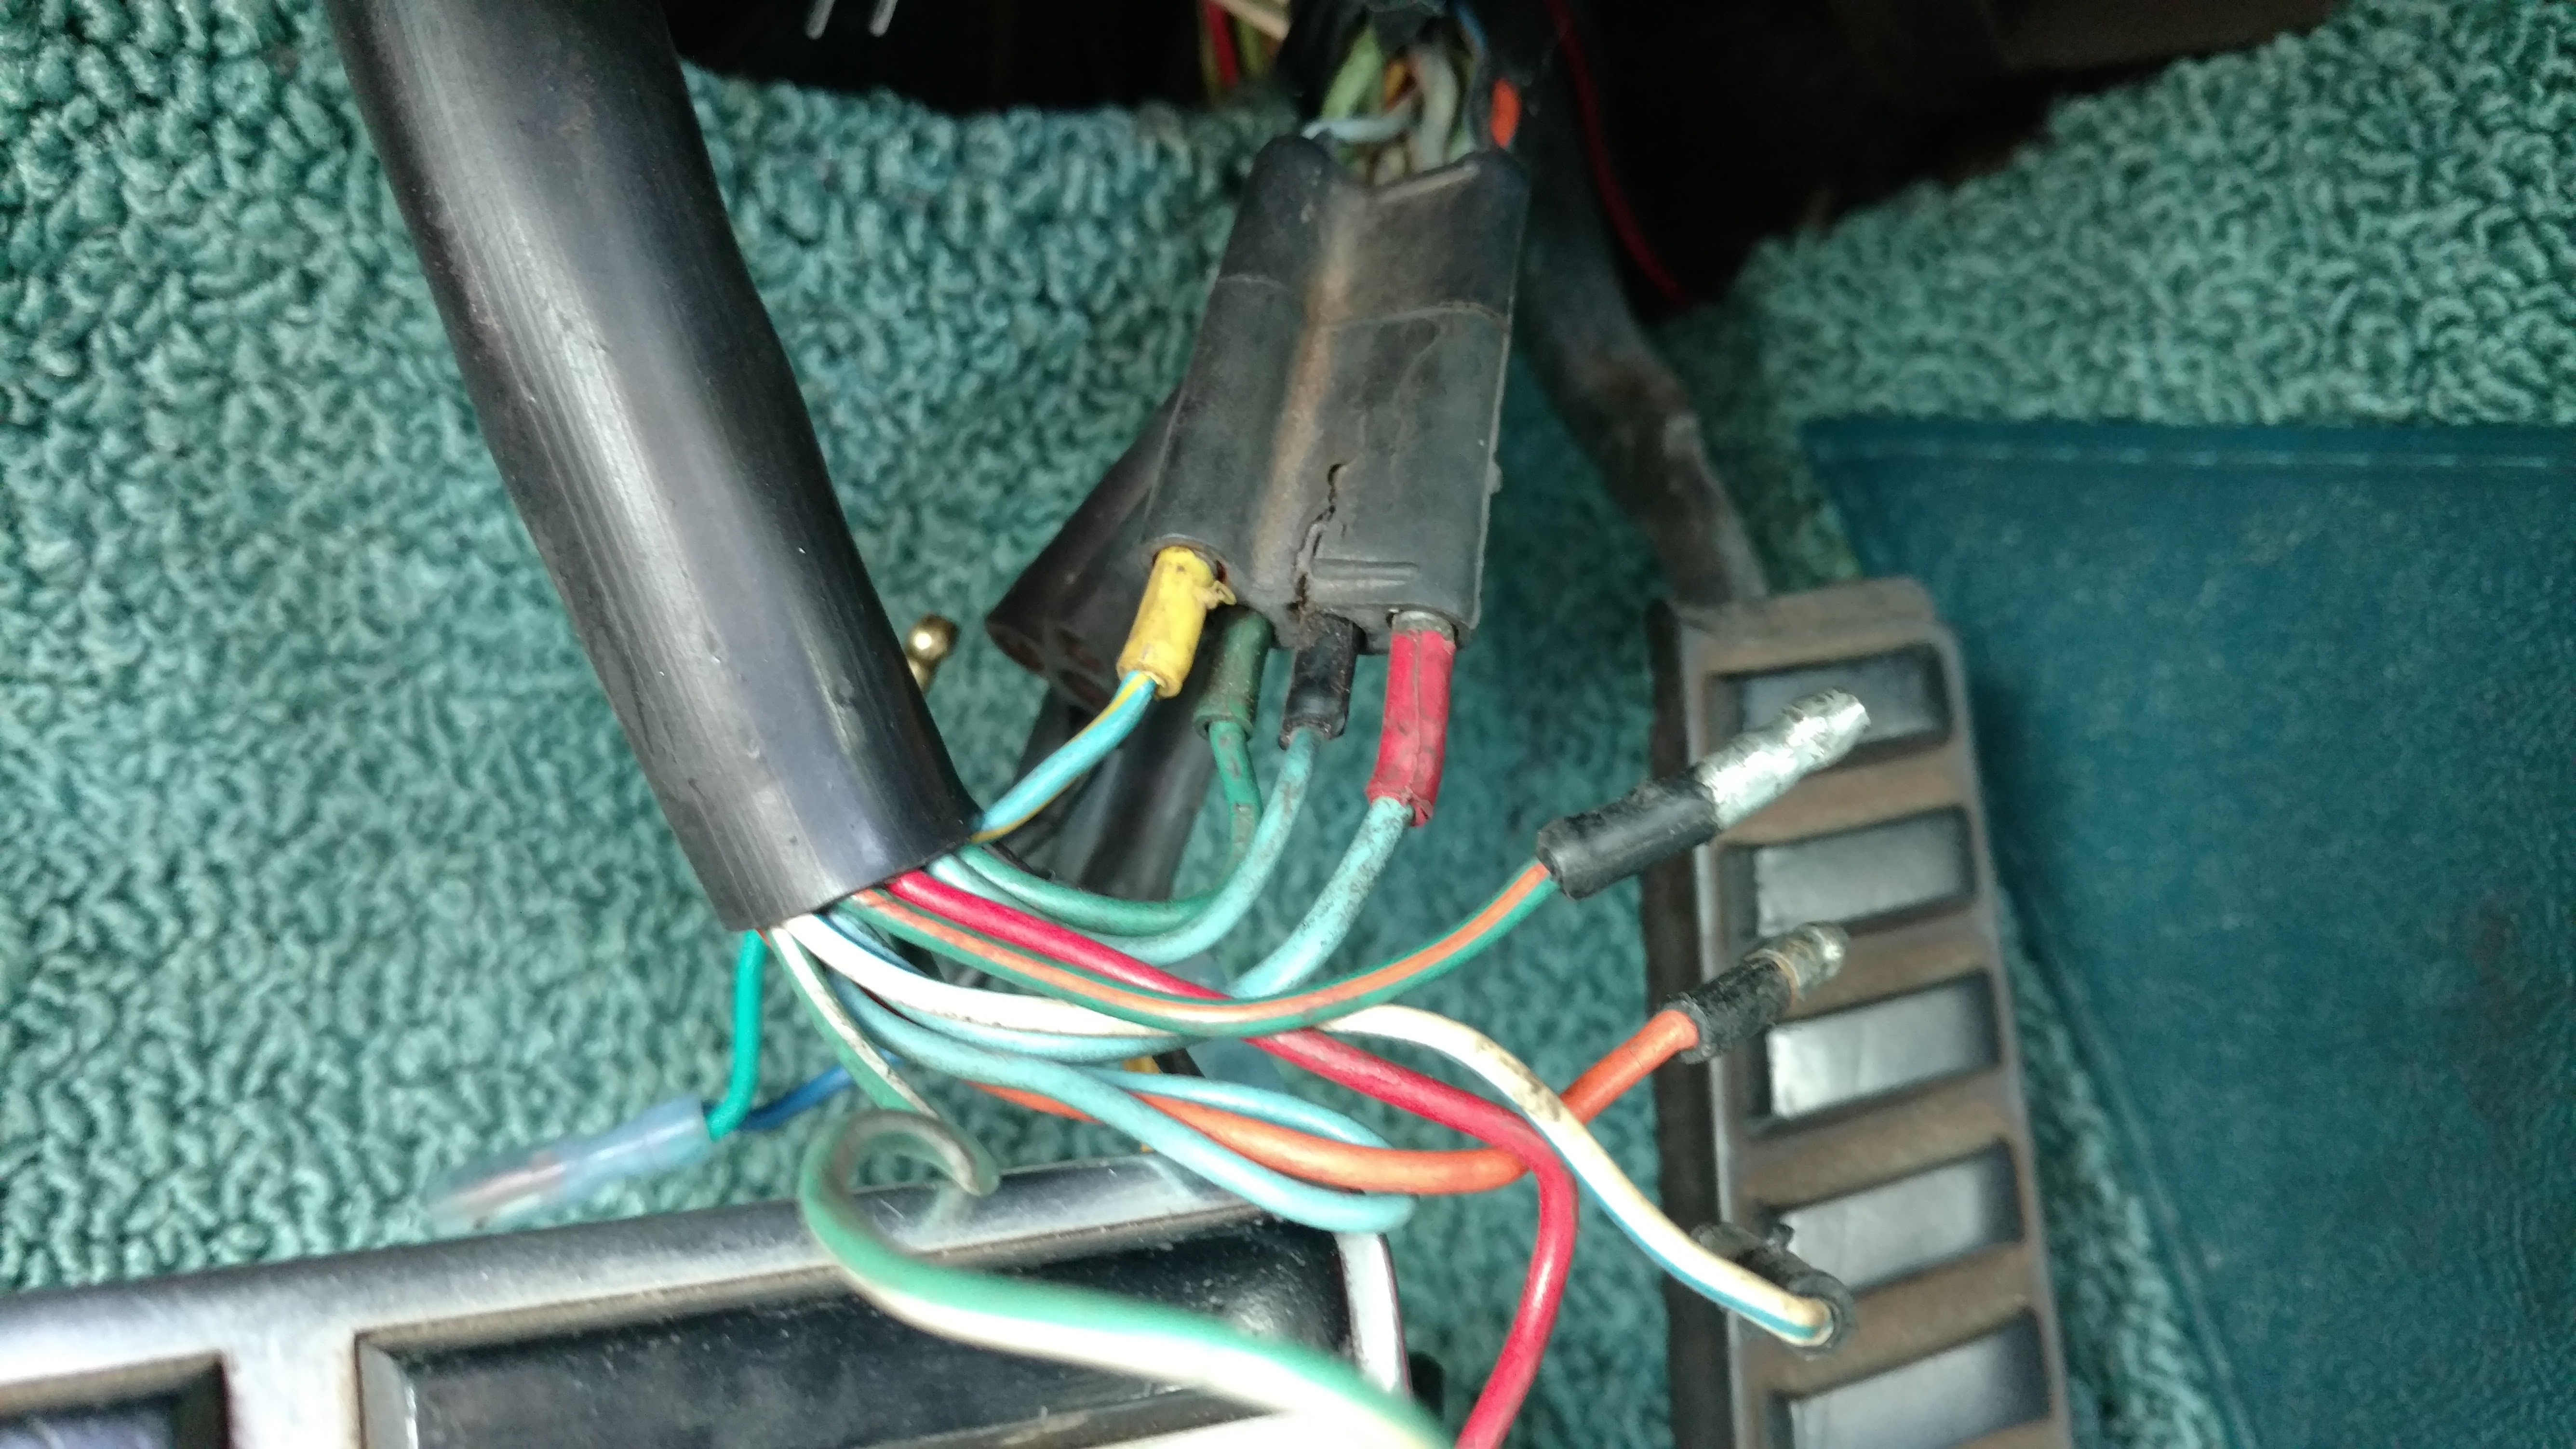
On the plus side, Bird Nest was able to email me a new wiring diagram. (Clearer and easier to read than the original, by far.) And, it only took me two tries to get the switch wired up correctly.
I took this photo as a way to remember how the old wires were installed, but looking at it now, it’s a grim reminder of the cracking, aging electrical system.
Last time I used this switch, the horn worked, at least sporadically. I removed the old horn brush (which was stuck), ordered a new one, and immediately misplaced it. For now, the steering wheel is loosely installed in the hopes that the new brush will materialize.