This is a major project I undertook without fully realizing the scope of work involved. In the end, it was absolutely necessary (for safety) and worth the frustrations I encountered.
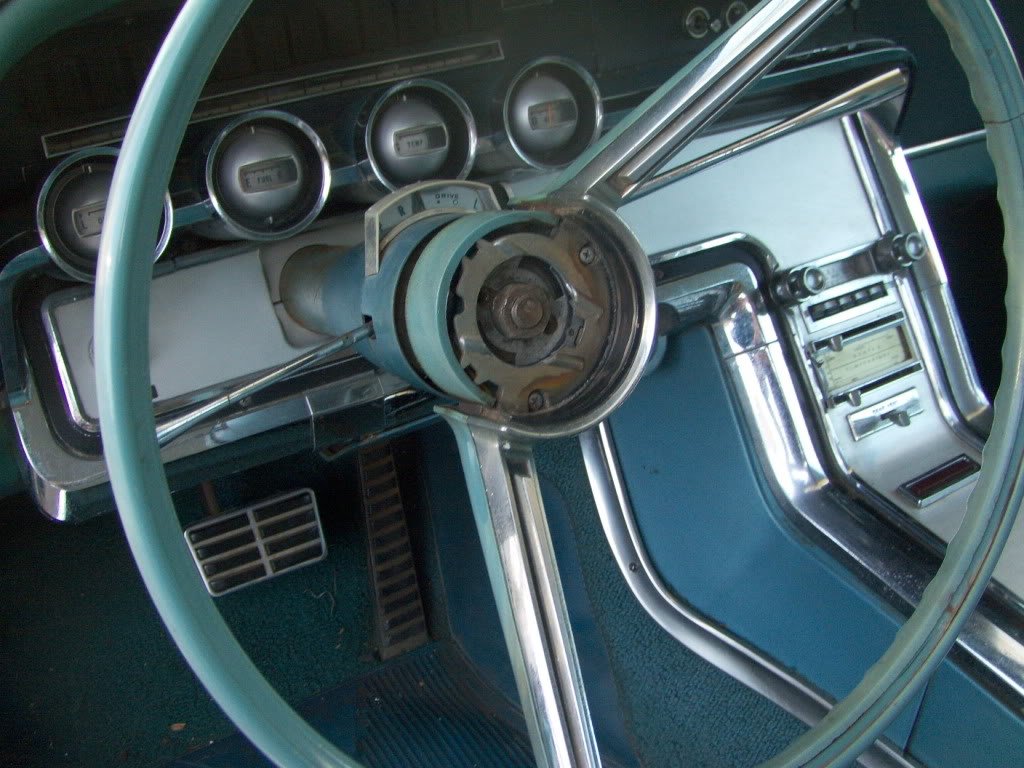
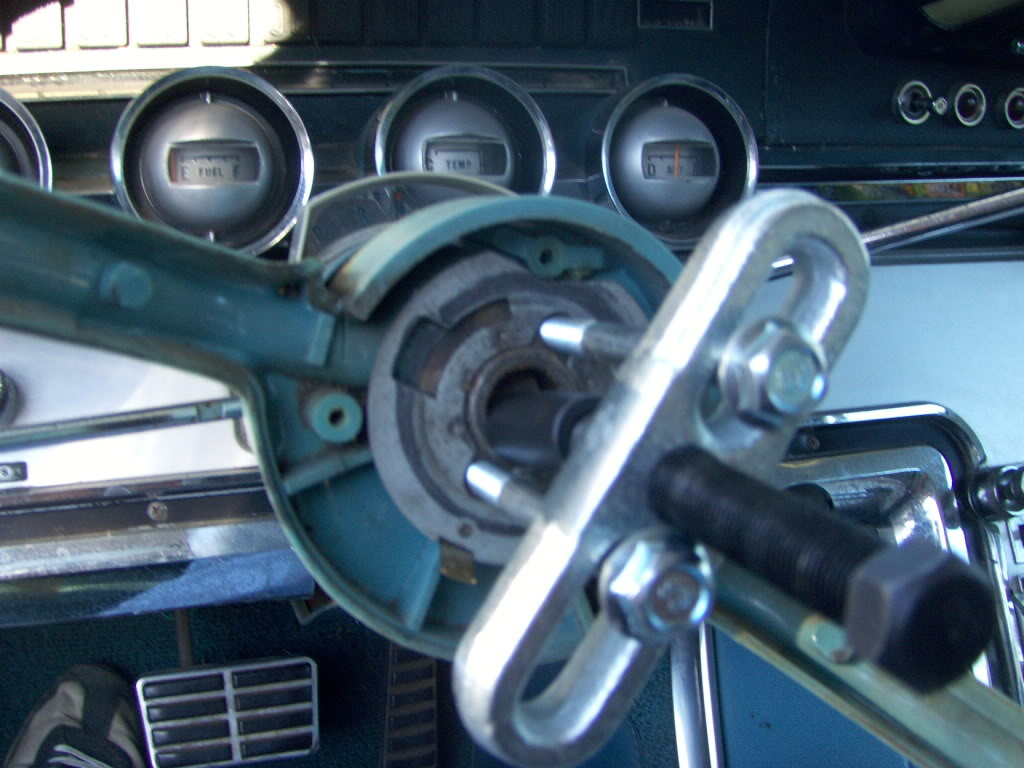
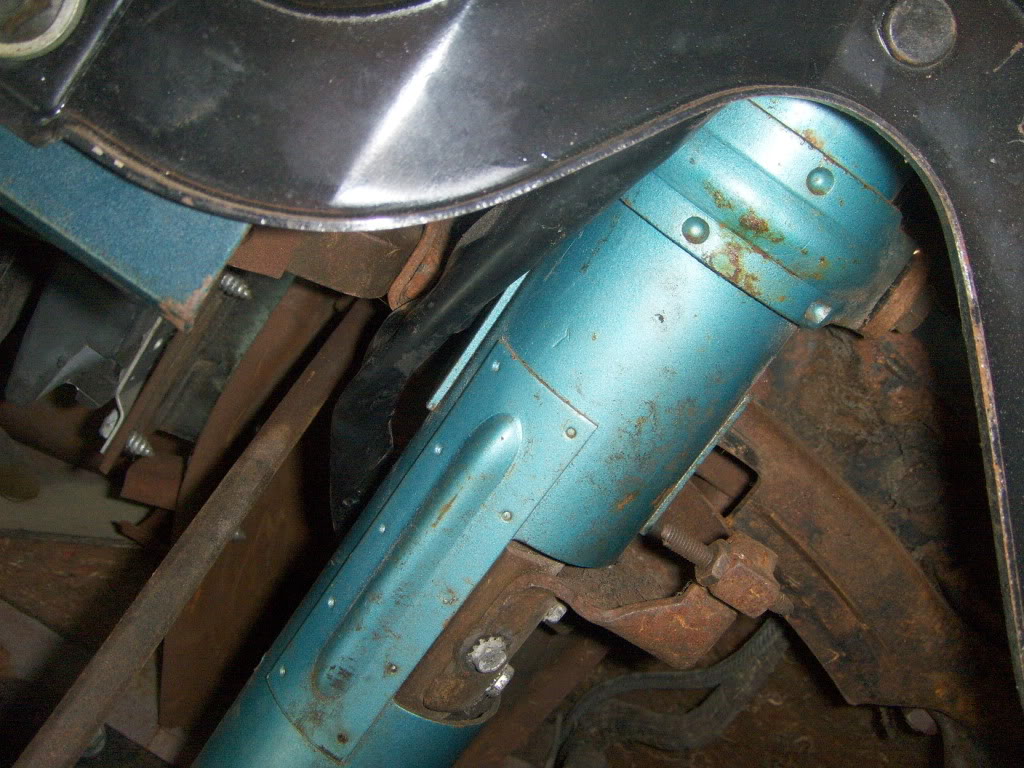
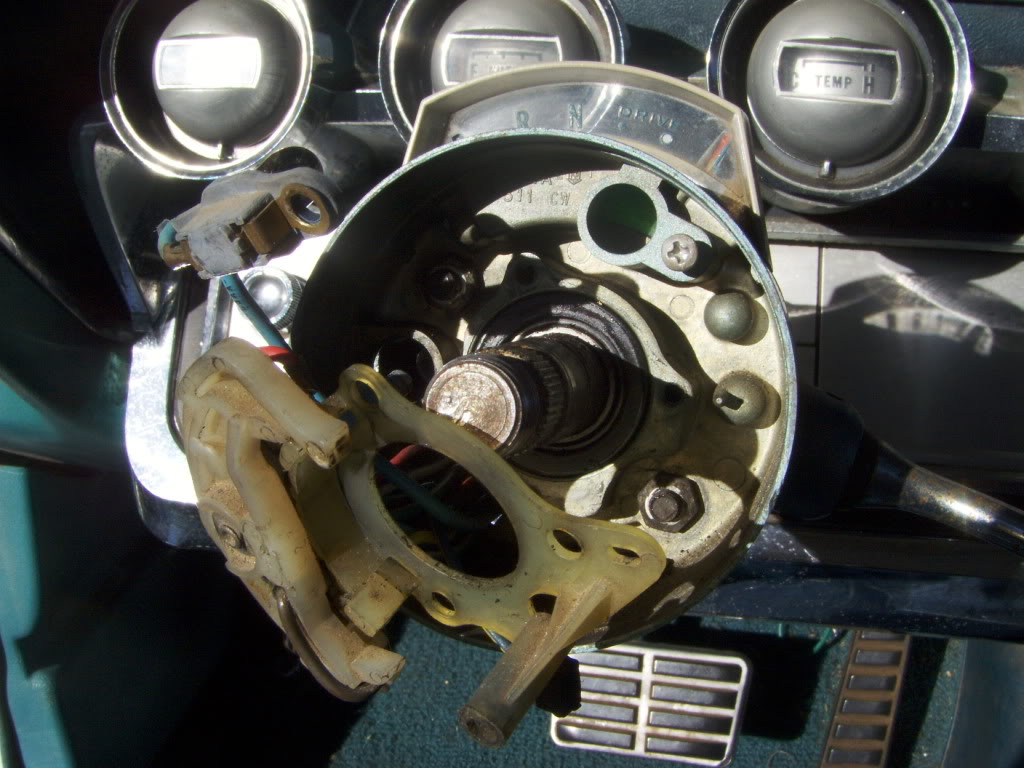
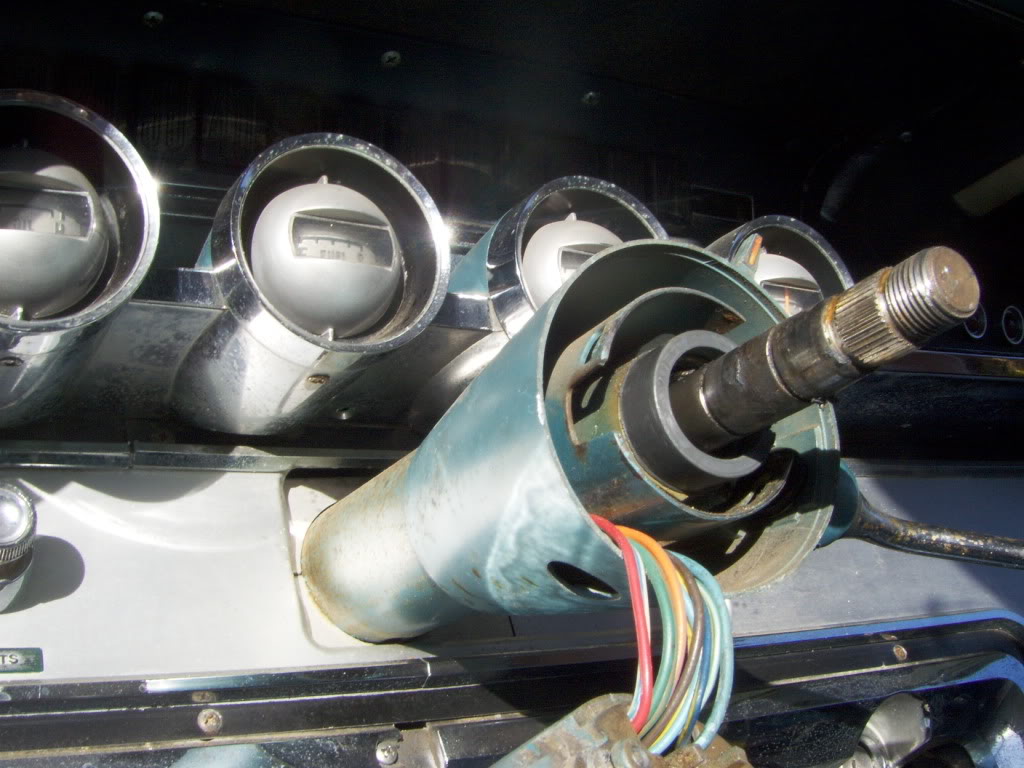
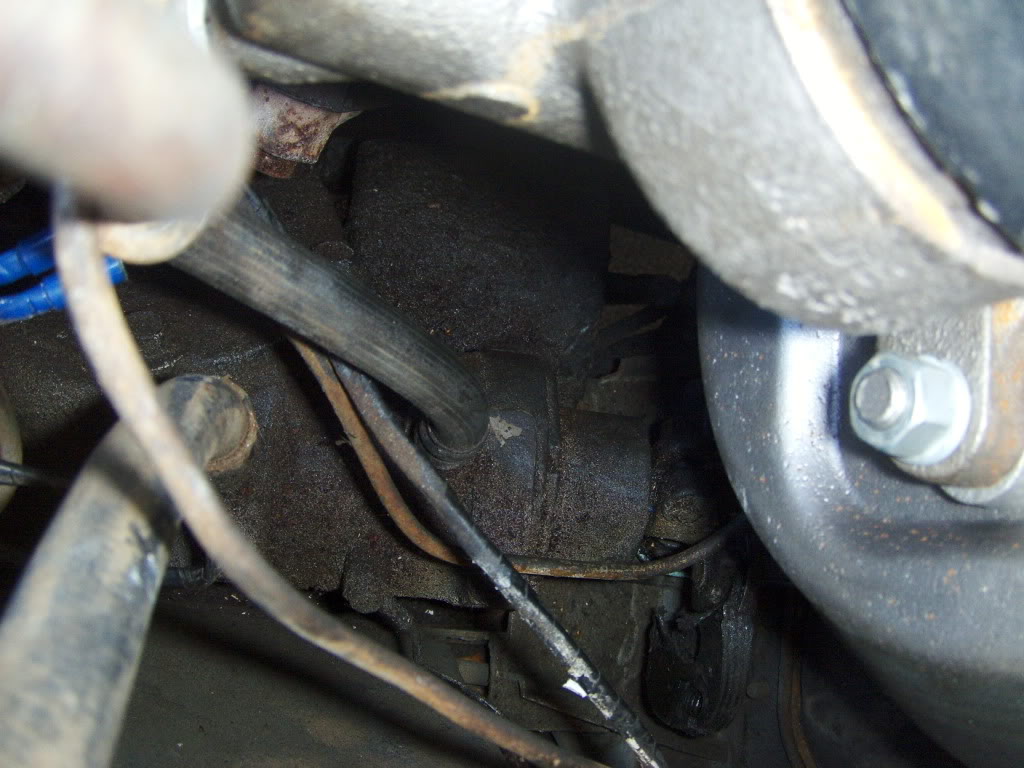
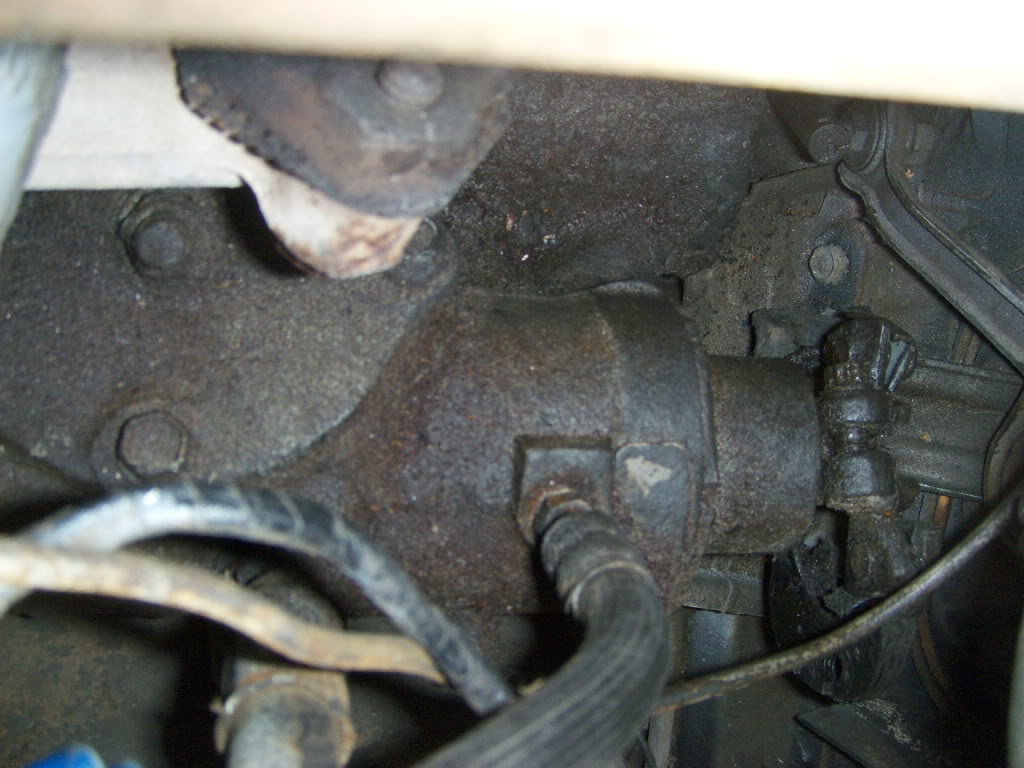
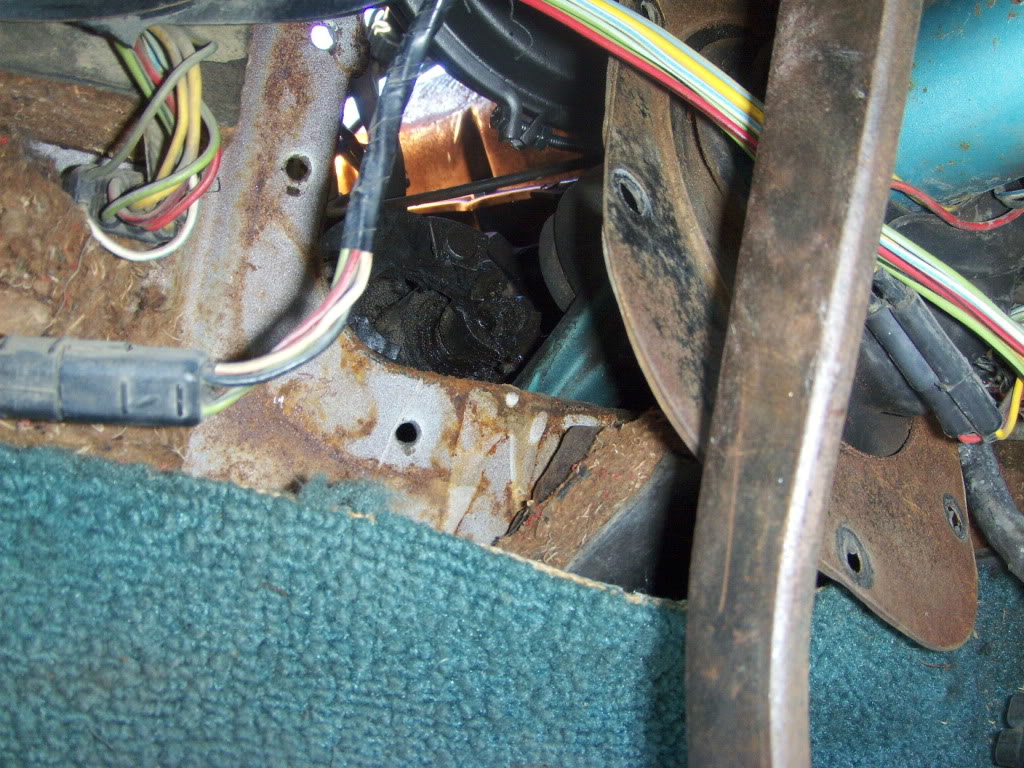
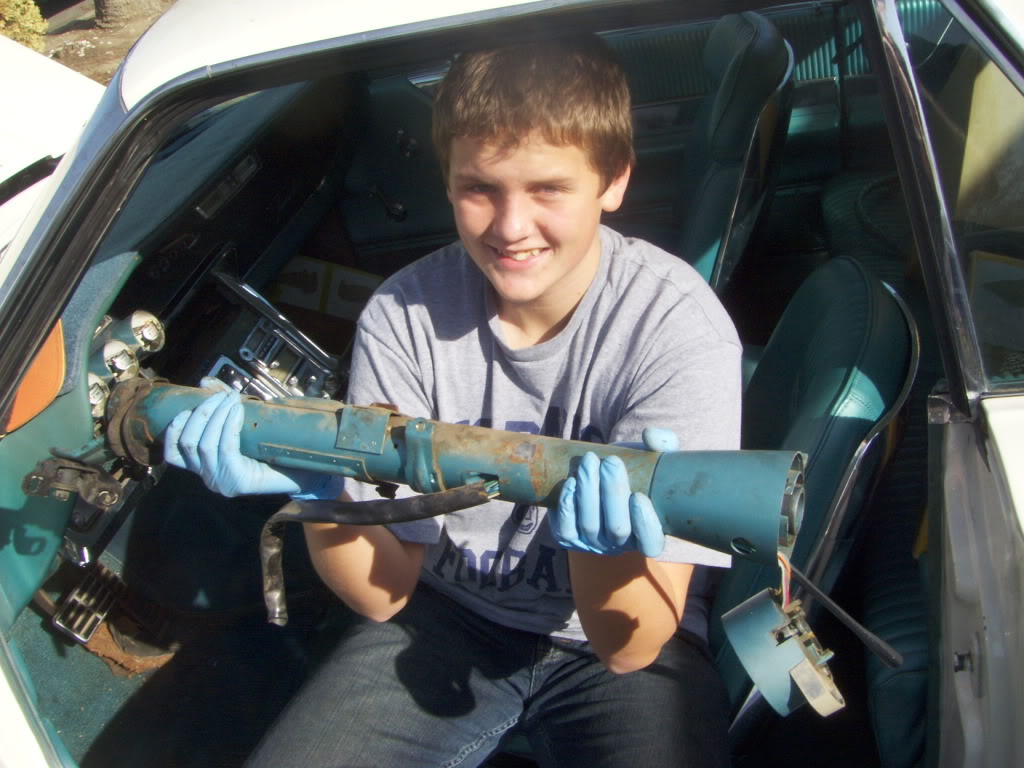
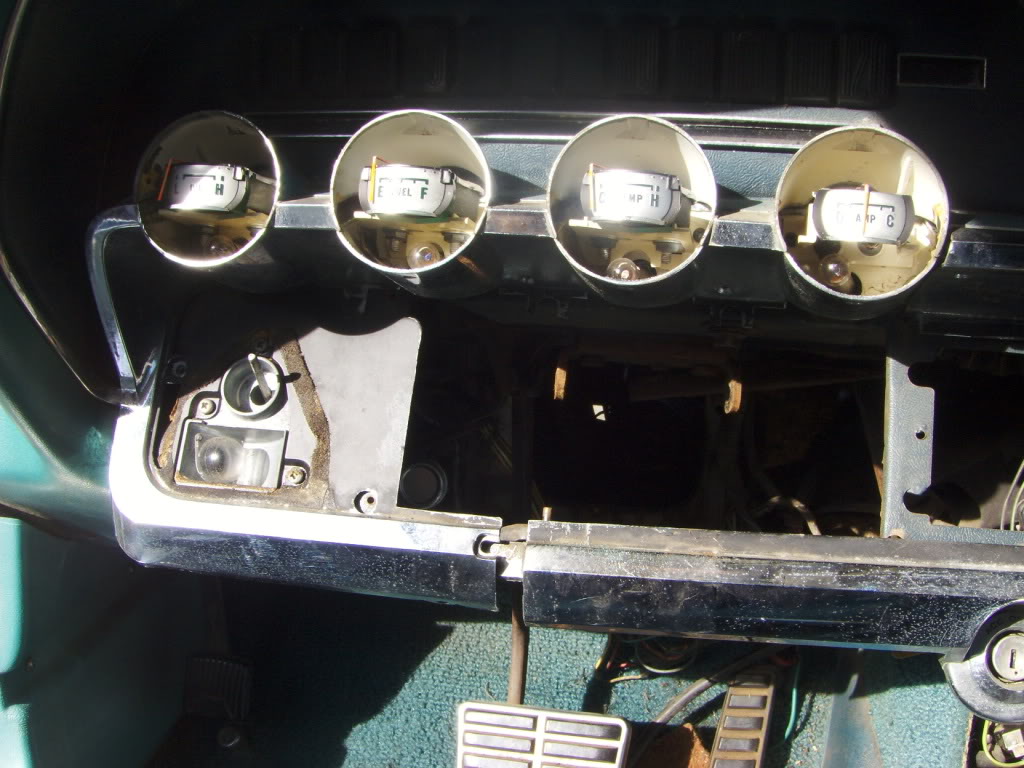
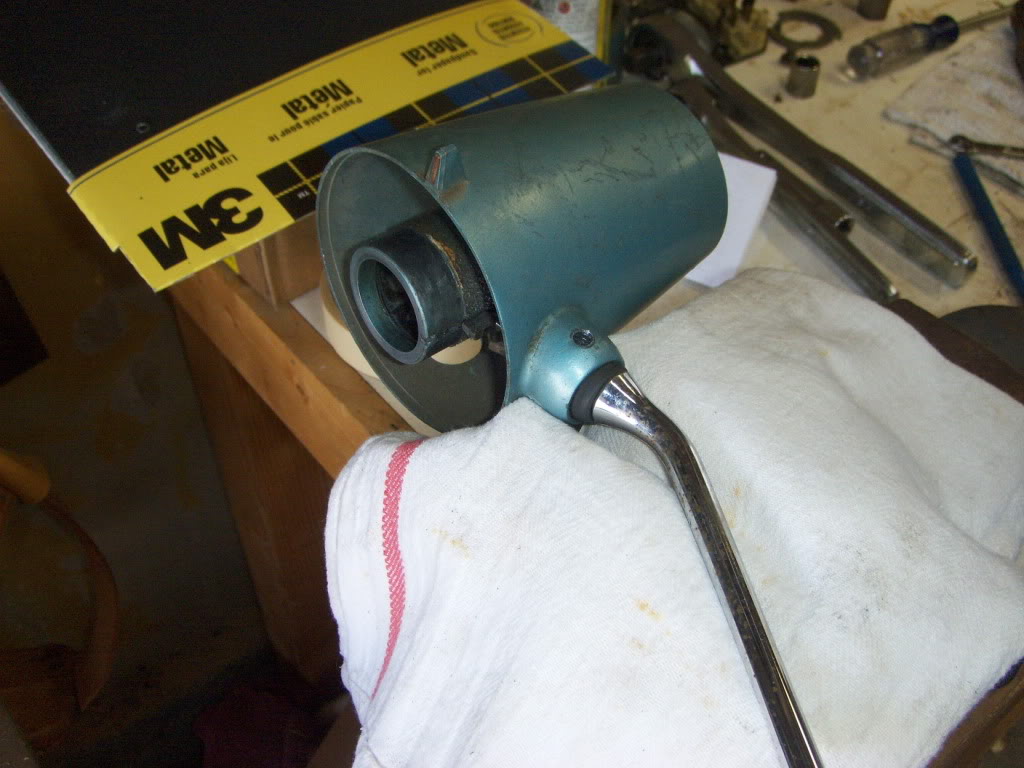
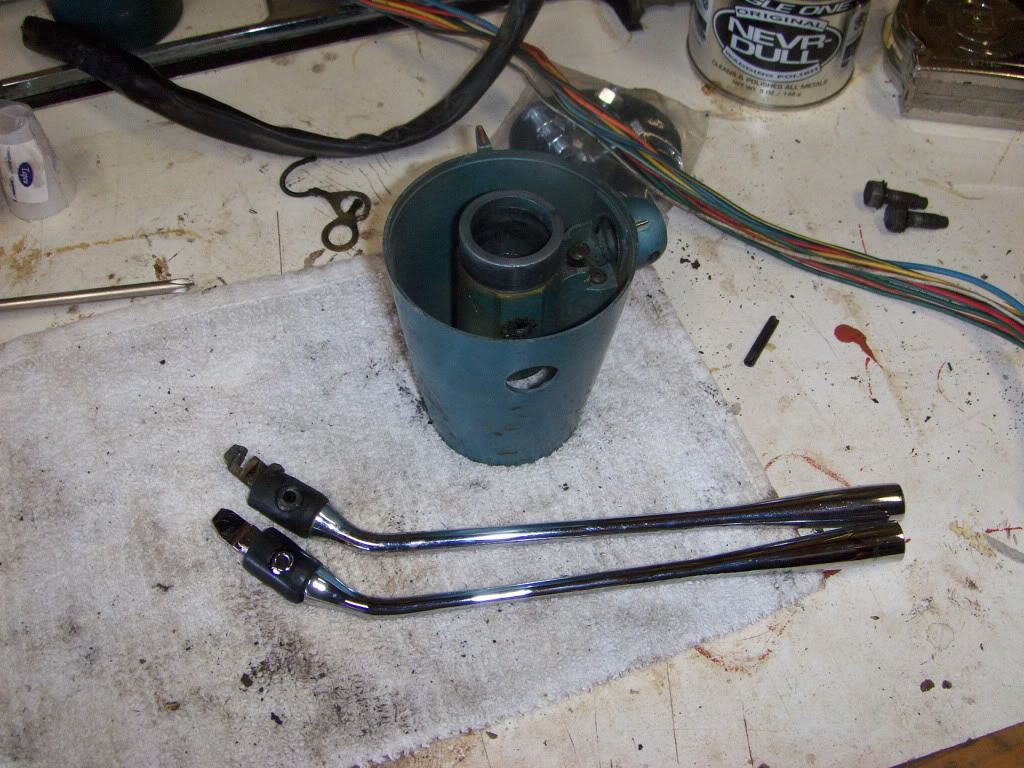
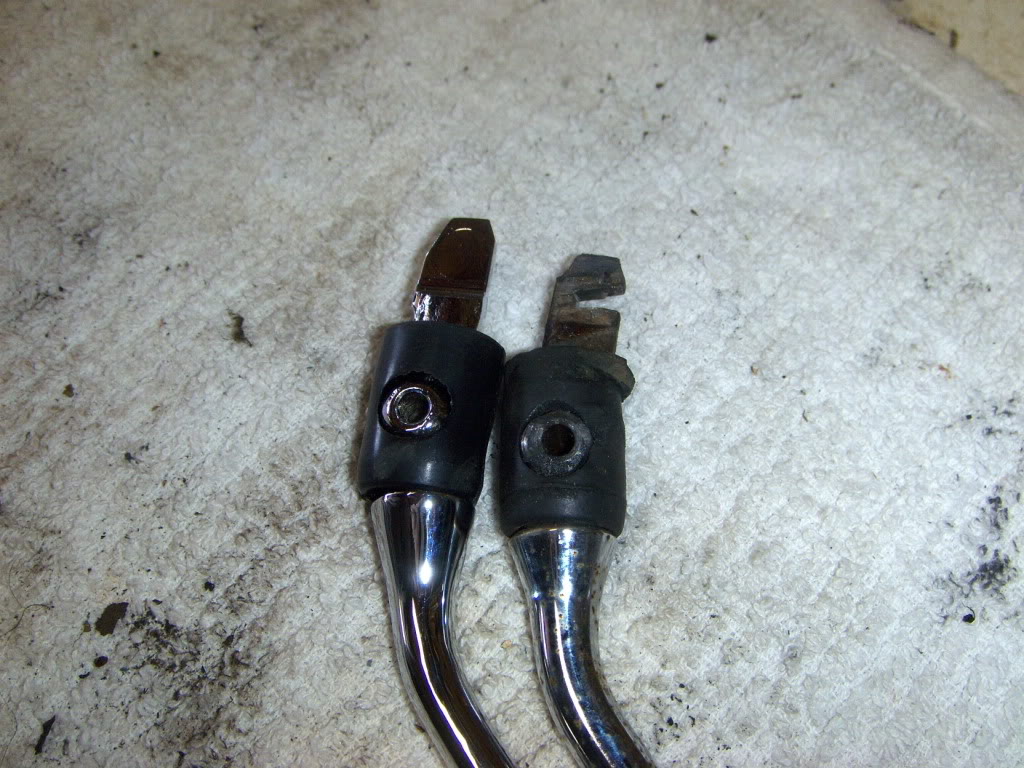
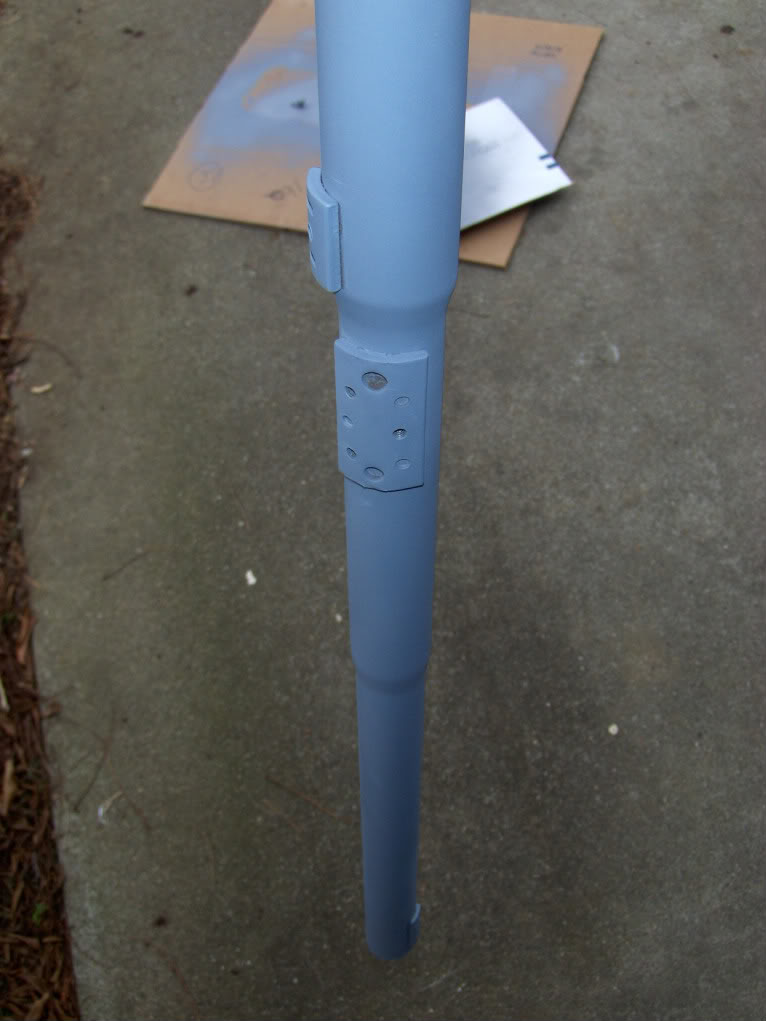
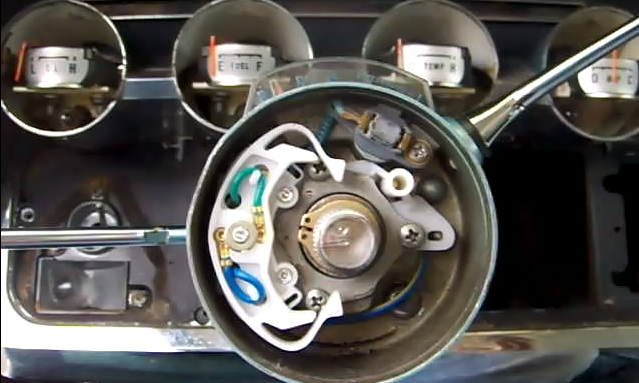
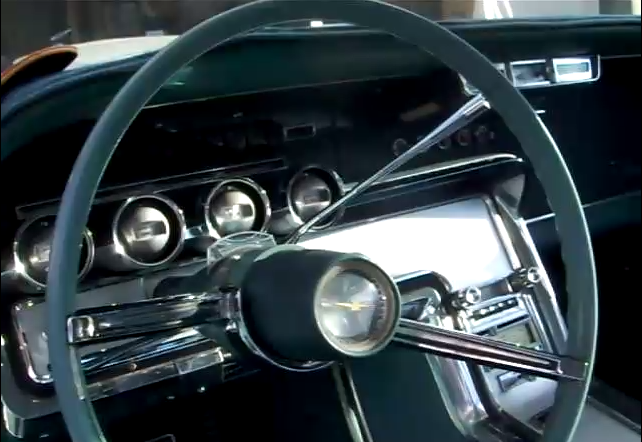
Here’s the column, set up and ready to get to work.Removing the horn ring is easy.Ready to remove the steering nut. This came off easily. But I still used the big socket wrench!You will absolutely need a steering wheel puller to get the wheel off the shaft.Getting the wheel off reveals the turn signal mechanism. The canceling prong for one direction was broken off and lying in the column.I went out and got a snap ring tool to help with removal of these pesky things. They are everywhere on this car.Here’s a view underneath. The rusty arm bolted to the shift tube is the mechanism for swinging the wheel away. I had to see it in action to visualize how it all worked.I knew I was going to replace this, but took it off carefully anyhow. I had to push the harness up from below to get some slack before it would come off over the shaft.With the turn signal out, the top bearing is visible. Mine was in ok shape, one of the few original pieces that was. In the end, I couldn’t get the shifter arm out while the column was in the car. But I tried long enough to put a few dents in the dashpad on the backstrokes. It only took about 15 minutes to realize that this wouldn’t work.This is under the hood. In the foreground, top right is the bolt holding the master cylinder to the booster. Behind that is what remains of the rag joint.A clearer shot of the 12 point bolt on the steering box side of the rag joint (far right). The side attached to the steering shaft is already removed. Behind it is the shift arm and one of the two bolts mounting the steering shaft to the firewall.The rubber boot on the firewall needs to come off. I should have taken this off earlier—a shop light on this side helps to illuminate the nearly inaccessible (and dark!) bolts on the engine side of the firewall.The column is attached under the dash to a U fitting with two bolts on either side.Not unlike landing a fish after a long fight. My son, with the prize.I only needed to remove the trim panel, lower fascia pieces and the radio access cover. The gauge bezels are off, but didn’t need to be. The swing away doors came off with the removal of two small bolts and a center clip.The shifter arm is resting on a vice under the towel. A few swift strokes of a hammer, and the pin came out. It should be noted that even with the towel, there was some damage to the collar.Old vs. new shifters.Most old shifters don’t seem to have a notch that deep. Someone in the past had shimmed the detent plate as a temporary fix.The centering cone is cracked and worn. The white plastic piece with the spiral cut in it appears to be part of a pvc pipe. It was stuck in the shift tube and may have been used as a lower bearing–there was no bearing at the bottom end. That little nut was used as a shim between the shifter lever and the spring to keep the notched lever pushed up against the detents.The detent plate has been ground down to almost nothing in places.Shift tube, cleaned and primed. Reinstallation, is, they say, the reverse of removal. Remember to put the new steering column boot on before you get the shift tube reassembled. There’s no easy way to do it after the fact if you forget. I know.
Shifter in Action
00:00
--
/
--
The working mechanism, above. I still couldn’t get into low at this point. When I had the transmission rebuilt, I learned that the linkage at the transmission was wrong as well.
I began to work on the steering column of my bird today as I had the steering gearbox out for rebuild and thought it logical to work with the column while unimpeded. Your pics and procedure description are proving most helpful.
Gearbox was leaking and had to be rebuilt. The rag joint was completely disintegrated and needed to be repaired / replaced as well as the grounding lead wire for the horn. I installed two ground leads as an extra measure in case one broke as mine already was. No more shocks when I press the horn .
Awesome journal. I’m in process of fixing up a 64 bird and there are a number of electrical hacks. I saw that there was a connector with red, yellow and brown wires which I think go to the turn signal switch. I have three sets of these wires. One set goes to the indicators, one set goes to the turn signal switch, but I can’t figure out where the last set goes. Any ideas? Also, was there a metal plate around the steering column in addition to the rubber sleeve. I just have a big hole for where the steering columns goes. Thanks and great job documenting.
Tony–glad you found the photos helpful. I think the plate you’re referring to is used to hold the steering column boot in place. It’ll seal that hole and still allow for the column to “swing away”. I replaced my turn signal switch and the replacement came with a wiring diagram. Unfortunately, I’m not sure how the stock set up is wired. You might find a wiring diagram helpful (there’s one in the manual) or pose the question on the VTCI forum (http://www.vintagethunderbirdclub.net/phpBB2/index.php). You don’t need to be a member to post, though I’ve found membership to be worthwhile.
Holy cow, just what I needed, thanks for the pictures, although it’s a bit too late for me. Wife got in the car yesterday, don’t know if she knocked the shifter or not but the car rolled down the drive, across the street, and slammed into the neighbors 10 ft diameter oak tree :<. Now my door glass and 1/4 window are overlapping when trying to close the door.
Hey john, just about done embarking the same journey repairing the rag joint, horn, steering wheel alignment, etc. Thanks so much for posting this journal. I could not have done it without your help. I noticed something on the 12th photo that the steering shaft is right in the center of the shift tube. Mine falls towards the bottom. Do you have some bearing or bushing between the shaft and tube holding it in the center? Thanks again.
There should be a bearing at the top of the steering column and a bushing at the bottom. It’s not uncommon for the lower bushing to be completely missing–a dangerous situation.
I got a replacement from Bird Nest. It was a little over $100 and was not an exact fit. The worrying is a little different (wiring diagram provided) and the plate that holds it down needed to be fileda bit to fit. I also had to enlarge the slot where the turn signal stalk fits.
Another option is to fine a good used part–I just installed one and it is far superior in feel.
In photo 10, on the right side is a nut (there is also one on the other side of the shaft. What do these attach to on the underside? I have taken mine apart but now I am trying to reassemble the column the nut and bolt arent attaching anything together? Hope this makes sense
I think you’re looking at the bolts that hold the shift collar to the shift tube. These screw into square nuts that fit into rectangular openings on the tube. As you tighten them, they hook into place and draw the parts together. Not easy to explain, or to do, either.
Not really, but if you go to Bird Nest (http://www.tbirdparts.com/main.htm) and click on the photo of the 64 in the upper left, they’ll give you a rundown of the parts you’ll need.
Hi again, another question 🙂
I’m trying to do the steering column bushing/shift lever/detent repair, and am having a heck of a time with two parts:
– the housing behind turn signal switch, last piece to take off before seeing detent, doesn’t want to come off. It’s loose, no screws holding it in, but won’t come off. Is the bearing holding it in place? Is it supposed to just pop off?
– to get steering shaft to pop out, guessing I need to loosen/remove 12 point bolt(s) on the rag joint part? Mine is solid as a rock, soaking in wd40 now…
Thanks!!
Assuming I understand correctly about the part you’re struggling with, take a look at picture 20. That hole in the side is access to a screw that holds this part to the shift column. Did you remove that screw?
For the shaft, you’ll need to loosen that 12-point bolt for sure. Good time to replace that ol’ rag joint too–50 year old part and the only thing keeping you in a straight line.
I think pic 20 shows the piece with the shift lever coming out of it. Part I’m stuck on is piece before that, the one with the little glass window showing what gear it’s in. I did take out one screw from the side, out of that hole u indicated, but it still seems stuck. It seems like there is a thick metal clip at top and bottom that’s holding it in. Feels like it should ‘pop’ out, but keeps stretching the rag joint so I don’t dare pull harder until I’ve got it on the bench…
Man, what a scare! I had not seen those bolts at all! When my brother pulled out column, myself helping out engine side, they must have fallen out of the column. But I did find them and it all makes sense now.
I found it easier maneuvering the steering column out/into Place with rag joint out. Those 12 point bolts sure put up a fight, and yes, they need to come all the way out.
Found my shift lever and detent plate in decent condition, so must have been repaired before car was parked. Turns out all the slop was due to missing bushings in shift linkage.
Fought shift linkage a while to get out, couldn’t see the two bolts anchoring it to body just under where steering column bracket is. After I found those it went out/in no prob.
Just sharing experience in case anyone else stumbles on here 🙂
Hi gentlemen, good read. My horn gives me a mild shock when pressed, can anyone explain what I need, also my left signal return doesn’t work. Thx for your input…Sean
Sean, can’t help much with the horn. You might want to try checking the ground–make sure it’s all there, nice and tight. As for the turn signal, I’d bet that the nylon lever is broken or worn, as mine was. Good luck.
Steve,
I just finished this project on my own ’64 and want to thank you for your well documented restoration. Your site has helped tremendously on my project.
Upon putting the column back together with all new shift parts from the birds nest, I placed the car in PARK, adjusted the neutral safety switch and when I started the car it lurched forward as if the car was in DRIVE. I checked the column to make sure everything is in the proper location and it all looks correct. My next step is the linkage between the trans and the shift column. I am just wondering if you experienced anything similar when putting the column back in the car. Any help or guidance would be appreciated.
Brad, I know from experience that’s a nasty feeling. It appears that two things went wrong somewhere. In park, obviously, the car should not be in gear. I think checking the linkage from the base of the column to the transmission is a good idea. Also, if the neutral safety switch is properly adjusted and the lever is in park, you shouldn’t have any power to the starter, no matter what’s going on with the linkage down below. Good luck!
I’d take a look at the shift linkage at the bottom of the column and down at the transmission. You may be missing a bushing (or two . . .) I don’t know of any adjustment for the pointer.
Thanks for the info. I bought a kit to repair the shifter and had the work done. It is still not right and I have to push the shift lever toward park to start the car. Cost me a lot of money. I should have done it myself. Thanks again.
If you’ve got a 64, a screwdriver and a few yoga poses (to get to the screws there are the base of the column) will allow you to loosen the neutral safety switch and adjust it to the correct location. (Assuming that everything in the column is actually fixed right.) Does your parking brake release work?
Never tried the P brake. I did notice a switch at the base of the column that had vacuum lines going to it. I had to put them back on because they came off. The lines come from under the dash and goes to the center console.
Those are the vacuum lines for the parking brake release. The switch you see is the neutral safety switch (nss). A lever on the shift column closes the safety switch (allowing the car to start) and opens the vacuum to the motor that releases the parking brake (if all is well). Two screws hold the nss on, and they allow for some adjustment side to side. I always get confused at this point, but I believe you want to rotate it clockwise along the column so you won’t have to hold the lever up to start the car.
I have a 64 t-bird and my brother moved the steering column to the left and then tried to put car in drive. Now it will not go in any gear. The shift lever movers to drive reverse, the linkage moves, however the trans will not engage.
connecting plugs from column to car,you have to disconnect plugs to pull wires through column shaft ,my girl lost the pics i took of which wire goes to which plug ,you help is greatly appreciated
I don’t believe I have photos of the wires at the base of the column, but they are color coded (as long as you’re using the stock turn signal switch). Plug the blue-white into the other blue-white, etc
I just replaced the detent and shift indicator on on 64 bird, for some reason i cant get the lower column cover to stay up to meet the horn/turn signal assembly and shifter wont stay to park. What have I done wrong? any help would be great
I’m going to have to check i suspect that is my problem,I put them in I just don’t know how they connect to the bottom portion to draw them both together
Those square nuts work like hooks in the lower portion. Not sure this makes sense, but run the nuts as far down the threads as you can, assemble everything, then hold the bolts down as you tighten. The nuts should grab the square openings in the lower section and draw everything together. Frustrating, even though it generally comes together ok, there’s no way to see if everything is right in there. I’m told Ford built columns like this for years; I have no idea why they thought this was the best solution.
thanks again for the speedy reply, that should do the trick. thanks for sharing your knowledge, and what a great looking car you have. Robert aka lovzfish
Hey I’m having dramas removing the top bearing on the column ,any ideas? I’m also having a drama with the steering shaft. It looks like it’s come forward about half an inch and now I can’t get it back down
Working from memory here, and it’s been a while. The shaft basically passes through the top and bottom bearings then into the coupler. It only fits one way into the coupler, so it may be that you’re hung up on something down at that end.
My memory of the top bearing is even more fuzzy, but I believe there is a snap ring or something behind the bearing, so when you pull the shaft up and out, the bearing has to come with it. I did my work with the whole column on the bench; it may be a lot more difficult to do with the column still in the car.
I have sloppy shift lever. Also, it stopped finding reverse could this be due to the steering column as well? It engages into drive just fine, neutral was hard to find. I also have to hold the shift lever up to start the vehicle. Any help would be appreciated. First time building a bird!
Not finding reverse may be an issue with the transmission or linkage, but the other items you describe are classic symptoms of a worn shift mechanism. I’d take care of the column before putting it on the road (or standing in front of it while it’s running).
Your article on the removing and replacing the steering column is terrific, I’m about ready to take the leap. My car sliding steering wheel feature has worked up until a couple weeks ago. Now it will only slide to the right about half of the distance, then it comes up to a hard stop. Before I tore into the steering column removal I wanted to know if there was some reason for this?
It’s hard to diagnose the swing-away issue without seeing the problem. The mechanism is pretty simple and accessible from underneath the dash. I’d grab a flashlight and crawl underneath to watch it in action. (Maybe remove the driver’s seat first.) The problem should be pretty evident when you inspect it.
Thanks Steve for your quick reply, you were right… I solved the swing away steering wheel problem. The wheel would swing about half way and stop. Today from a different vantage point, the seat was already out, I found a paul/dog that was running into the track.
Here’s the reason, my top and bottom steering column bushings are shot, I wedged a screw driver under the steering column to raise it up and walla, the swing away steering wheel works.
I’m removing the dash and steering housing to repaint, install a new speedo cable and housing, and tune up all the different components of the steering and shifting. Stay tuned, film at eleven, next month I hope… LOL
Great photos! I’m trying to replace the gear indicator (the housing with PRNDL on the window). How far into disassembly do I have to go to remove the indicator? I was studying the photo that shows that snap ring tool. Do I need to remove that snap ring? Will I be able to access the housing at that point?
Hi guys,
Interesting read. I’m having my mechanic rebuild my 63 TBird column as it starts in Reverse and there is other damage. One thing he’s asking for is an exploded diagram of the column and in particular about the 3rd last post photo and question. The second last post “I remember a strange nut on the other side that fit in a slot that was used to compress the two halves together”. this “Strange Nut” is missing and apparently is the reason for my column failure. Can anyone shed light on the name of this missing part/nut, give me a best view exploded diagram of the shaft and parts or link to one?
I also need the diagram to include the fixture method of the underside of the Shift Collar Bowl (must be a plate or locking bolts that come up through the bottom of the bowl and hold it onto the column??
Any and all help gratefully appreciated.
Your best bet for a diagram is the shop manual for your car. Reproductions are widely available from parts suppliers and even places like Amazon. If you find the manual inadequate, check out the Osborne assembly manuals or restoration guides available from VTCI.
Great website, congratulations. I got a 1964 Landau and will bring it back in perfect shape. Do you know if anywhere is a set available to refresh the steering culumn and shifter. Thanks in advance.
Congrats on your new ‘Bird. I don’t know of any parts house that sells the rebuild kits as a set, since not everyone will need every part. Bird Nest used to have a list of common parts grouped together on their site (http://tbirdparts.com/), but it appears they’ve removed it. I’m sure, though, that they still have everything you would need: upper bearing, lower bushing, centering cone shifter and detente plate. Also, while you have it out, the rag joint should be replaced as well. Good luck!
Thank you for your quick reply and the english names of the needed parts. Without knowledge of this specific names it is very hard to search for the right parts. When the job is done i give a short feedback.
Hi. Thanks for sharing these images. I have a 65 TBird and I’m on the home stretch of having the horn buttons fixed. Can you describe for me the placement of the metal clips and springs located behind the horn buttons? It seems that the springs were missing in mine. I have everything fixed so that the horns do not blow continually, but now there is not enough tension on the buttons. When you get in and out of the car, just bumping the steering wheel causes the horns to blow. 🙂 If you can help I would be most appreciative.
Sorry, Brett, it’s been a while since I’ve dug into the column, so I can’t really give a detailed description. Best bet is probably the shop and/or assembly manuals (both available on Amazon), or post a question to the VTCI forums.
Thank you so much for this Blog! I am a considerably young 64 T bird owner and like yours was a solid project between father and son. It’s reassuring to know someone has shared the same problems and its not just my car!
Your blog has been very helpful to me! Please keep it running!!
This blog is great! I am a considerably young 64 T bird owner. A lot of the post you have shared on this blog have been very useful and has reasured me that I was not the only one going through the same problems.
Keep the blog and great posts up!
Chris
You’ve got to dig down past the horn ring, steering wheel and turn indicator, but no need to remove the collar or the steering column itself. Do yourself a favor before pulling it apart and check at the base of the column and the rag joint to ensure that the ground wires are still there.
thanks for putting together site. say I have a 64 and want to install new shifter, which position does it need to be in to line up correctly on the detent? the column is out of car. Column has been rebuilt. Should I wait to install column back in dash before installing shift lever?
It’s been a while, but I believe you can install the shift lever in any of the positions—you’ll just need to wiggle it around to get it seated properly. I would install it before you put the column in. I’m not a fan of swinging a hammer around inside the car.
Congrats on the new Thunderbird. I hope you enjoy it!


thank you sir.
I began to work on the steering column of my bird today as I had the steering gearbox out for rebuild and thought it logical to work with the column while unimpeded. Your pics and procedure description are proving most helpful.
John, glad the photos were useful. Was your gearbox giving you trouble? Mine is growling when I turn right and I fear the worst.
Gearbox was leaking and had to be rebuilt. The rag joint was completely disintegrated and needed to be repaired / replaced as well as the grounding lead wire for the horn. I installed two ground leads as an extra measure in case one broke as mine already was. No more shocks when I press the horn .
Awesome journal. I’m in process of fixing up a 64 bird and there are a number of electrical hacks. I saw that there was a connector with red, yellow and brown wires which I think go to the turn signal switch. I have three sets of these wires. One set goes to the indicators, one set goes to the turn signal switch, but I can’t figure out where the last set goes. Any ideas? Also, was there a metal plate around the steering column in addition to the rubber sleeve. I just have a big hole for where the steering columns goes. Thanks and great job documenting.
Tony–glad you found the photos helpful. I think the plate you’re referring to is used to hold the steering column boot in place. It’ll seal that hole and still allow for the column to “swing away”. I replaced my turn signal switch and the replacement came with a wiring diagram. Unfortunately, I’m not sure how the stock set up is wired. You might find a wiring diagram helpful (there’s one in the manual) or pose the question on the VTCI forum (http://www.vintagethunderbirdclub.net/phpBB2/index.php). You don’t need to be a member to post, though I’ve found membership to be worthwhile.
Holy cow, just what I needed, thanks for the pictures, although it’s a bit too late for me. Wife got in the car yesterday, don’t know if she knocked the shifter or not but the car rolled down the drive, across the street, and slammed into the neighbors 10 ft diameter oak tree :<. Now my door glass and 1/4 window are overlapping when trying to close the door.
Hey john, just about done embarking the same journey repairing the rag joint, horn, steering wheel alignment, etc. Thanks so much for posting this journal. I could not have done it without your help. I noticed something on the 12th photo that the steering shaft is right in the center of the shift tube. Mine falls towards the bottom. Do you have some bearing or bushing between the shaft and tube holding it in the center? Thanks again.
Sorry, i meant to say thanks to seebart.
There should be a bearing at the top of the steering column and a bushing at the bottom. It’s not uncommon for the lower bushing to be completely missing–a dangerous situation.
Hello, im currently replacing my turn signal unit and would like to know where u bought your parts.
Thanks
art
I got a replacement from Bird Nest. It was a little over $100 and was not an exact fit. The worrying is a little different (wiring diagram provided) and the plate that holds it down needed to be fileda bit to fit. I also had to enlarge the slot where the turn signal stalk fits.
Another option is to fine a good used part–I just installed one and it is far superior in feel.
thunder bird head quarters or bobs bird nest
In photo 10, on the right side is a nut (there is also one on the other side of the shaft. What do these attach to on the underside? I have taken mine apart but now I am trying to reassemble the column the nut and bolt arent attaching anything together? Hope this makes sense
I think you’re looking at the bolts that hold the shift collar to the shift tube. These screw into square nuts that fit into rectangular openings on the tube. As you tighten them, they hook into place and draw the parts together. Not easy to explain, or to do, either.
Got it thankyou, it worked first time, I appreciate the help. I was stuck for days!!!
is there a standard rebuild kit for these steering columns?
Not really, but if you go to Bird Nest (http://www.tbirdparts.com/main.htm) and click on the photo of the 64 in the upper left, they’ll give you a rundown of the parts you’ll need.
Hi again, another question 🙂
I’m trying to do the steering column bushing/shift lever/detent repair, and am having a heck of a time with two parts:
– the housing behind turn signal switch, last piece to take off before seeing detent, doesn’t want to come off. It’s loose, no screws holding it in, but won’t come off. Is the bearing holding it in place? Is it supposed to just pop off?
– to get steering shaft to pop out, guessing I need to loosen/remove 12 point bolt(s) on the rag joint part? Mine is solid as a rock, soaking in wd40 now…
Thanks!!
Assuming I understand correctly about the part you’re struggling with, take a look at picture 20. That hole in the side is access to a screw that holds this part to the shift column. Did you remove that screw?
For the shaft, you’ll need to loosen that 12-point bolt for sure. Good time to replace that ol’ rag joint too–50 year old part and the only thing keeping you in a straight line.
~Steve
I think pic 20 shows the piece with the shift lever coming out of it. Part I’m stuck on is piece before that, the one with the little glass window showing what gear it’s in. I did take out one screw from the side, out of that hole u indicated, but it still seems stuck. It seems like there is a thick metal clip at top and bottom that’s holding it in. Feels like it should ‘pop’ out, but keeps stretching the rag joint so I don’t dare pull harder until I’ve got it on the bench…
Klaus, have you removed the two nuts/bolts that draw these two pieces together? Take a look at these photos:
http://www.vintagethunderbirdclub.net/phpBB2/viewtopic.php?t=10905
Man, what a scare! I had not seen those bolts at all! When my brother pulled out column, myself helping out engine side, they must have fallen out of the column. But I did find them and it all makes sense now.
I found it easier maneuvering the steering column out/into Place with rag joint out. Those 12 point bolts sure put up a fight, and yes, they need to come all the way out.
Found my shift lever and detent plate in decent condition, so must have been repaired before car was parked. Turns out all the slop was due to missing bushings in shift linkage.
Fought shift linkage a while to get out, couldn’t see the two bolts anchoring it to body just under where steering column bracket is. After I found those it went out/in no prob.
Just sharing experience in case anyone else stumbles on here 🙂
When I did it I had to remove the 12 pt screw completely. Loosening it won’t work since the screw fits into a notch in the steering shaft. Cheers.
Hi gentlemen, good read. My horn gives me a mild shock when pressed, can anyone explain what I need, also my left signal return doesn’t work. Thx for your input…Sean
Sean, can’t help much with the horn. You might want to try checking the ground–make sure it’s all there, nice and tight. As for the turn signal, I’d bet that the nylon lever is broken or worn, as mine was. Good luck.
Steve,
I just finished this project on my own ’64 and want to thank you for your well documented restoration. Your site has helped tremendously on my project.
Upon putting the column back together with all new shift parts from the birds nest, I placed the car in PARK, adjusted the neutral safety switch and when I started the car it lurched forward as if the car was in DRIVE. I checked the column to make sure everything is in the proper location and it all looks correct. My next step is the linkage between the trans and the shift column. I am just wondering if you experienced anything similar when putting the column back in the car. Any help or guidance would be appreciated.
Brad, I know from experience that’s a nasty feeling. It appears that two things went wrong somewhere. In park, obviously, the car should not be in gear. I think checking the linkage from the base of the column to the transmission is a good idea. Also, if the neutral safety switch is properly adjusted and the lever is in park, you shouldn’t have any power to the starter, no matter what’s going on with the linkage down below. Good luck!
john have trouble figuring how to replace parts that make the shift lever hold in place can you help me it drops down in gear
Sorry, can you be a little clearer about which part you’re struggling with?
How do you adjust the pointer on the shift lever to align with the letters on the column. In reverse the pointer is off about 3/8 of a inch. Thanks
I’d take a look at the shift linkage at the bottom of the column and down at the transmission. You may be missing a bushing (or two . . .) I don’t know of any adjustment for the pointer.
Thanks for the info. I bought a kit to repair the shifter and had the work done. It is still not right and I have to push the shift lever toward park to start the car. Cost me a lot of money. I should have done it myself. Thanks again.
If you’ve got a 64, a screwdriver and a few yoga poses (to get to the screws there are the base of the column) will allow you to loosen the neutral safety switch and adjust it to the correct location. (Assuming that everything in the column is actually fixed right.) Does your parking brake release work?
Never tried the P brake. I did notice a switch at the base of the column that had vacuum lines going to it. I had to put them back on because they came off. The lines come from under the dash and goes to the center console.
Those are the vacuum lines for the parking brake release. The switch you see is the neutral safety switch (nss). A lever on the shift column closes the safety switch (allowing the car to start) and opens the vacuum to the motor that releases the parking brake (if all is well). Two screws hold the nss on, and they allow for some adjustment side to side. I always get confused at this point, but I believe you want to rotate it clockwise along the column so you won’t have to hold the lever up to start the car.
I have a 64 t-bird and my brother moved the steering column to the left and then tried to put car in drive. Now it will not go in any gear. The shift lever movers to drive reverse, the linkage moves, however the trans will not engage.
Would any one have picture of the plugs at the bottom of steering column on a 64 tbird conv
Not sure what you mean by “plugs.” Can you clarify?
connecting plugs from column to car,you have to disconnect plugs to pull wires through column shaft ,my girl lost the pics i took of which wire goes to which plug ,you help is greatly appreciated
I don’t believe I have photos of the wires at the base of the column, but they are color coded (as long as you’re using the stock turn signal switch). Plug the blue-white into the other blue-white, etc
I just replaced the detent and shift indicator on on 64 bird, for some reason i cant get the lower column cover to stay up to meet the horn/turn signal assembly and shifter wont stay to park. What have I done wrong? any help would be great
There are two nuts + bolts that draw the assembly together, but they are difficult to engage properly. Do you know that they went in correctly?
I’m going to have to check i suspect that is my problem,I put them in I just don’t know how they connect to the bottom portion to draw them both together
Those square nuts work like hooks in the lower portion. Not sure this makes sense, but run the nuts as far down the threads as you can, assemble everything, then hold the bolts down as you tighten. The nuts should grab the square openings in the lower section and draw everything together. Frustrating, even though it generally comes together ok, there’s no way to see if everything is right in there. I’m told Ford built columns like this for years; I have no idea why they thought this was the best solution.
thanks again for the speedy reply, that should do the trick. thanks for sharing your knowledge, and what a great looking car you have. Robert aka lovzfish
Hey I’m having dramas removing the top bearing on the column ,any ideas? I’m also having a drama with the steering shaft. It looks like it’s come forward about half an inch and now I can’t get it back down
Working from memory here, and it’s been a while. The shaft basically passes through the top and bottom bearings then into the coupler. It only fits one way into the coupler, so it may be that you’re hung up on something down at that end.
My memory of the top bearing is even more fuzzy, but I believe there is a snap ring or something behind the bearing, so when you pull the shaft up and out, the bearing has to come with it. I did my work with the whole column on the bench; it may be a lot more difficult to do with the column still in the car.
I have sloppy shift lever. Also, it stopped finding reverse could this be due to the steering column as well? It engages into drive just fine, neutral was hard to find. I also have to hold the shift lever up to start the vehicle. Any help would be appreciated. First time building a bird!
Not finding reverse may be an issue with the transmission or linkage, but the other items you describe are classic symptoms of a worn shift mechanism. I’d take care of the column before putting it on the road (or standing in front of it while it’s running).
Your article on the removing and replacing the steering column is terrific, I’m about ready to take the leap. My car sliding steering wheel feature has worked up until a couple weeks ago. Now it will only slide to the right about half of the distance, then it comes up to a hard stop. Before I tore into the steering column removal I wanted to know if there was some reason for this?
Thanks,
Mitch
It’s hard to diagnose the swing-away issue without seeing the problem. The mechanism is pretty simple and accessible from underneath the dash. I’d grab a flashlight and crawl underneath to watch it in action. (Maybe remove the driver’s seat first.) The problem should be pretty evident when you inspect it.
Good luck with restoring the column.
Thanks Steve for your quick reply, you were right… I solved the swing away steering wheel problem. The wheel would swing about half way and stop. Today from a different vantage point, the seat was already out, I found a paul/dog that was running into the track.
Here’s the reason, my top and bottom steering column bushings are shot, I wedged a screw driver under the steering column to raise it up and walla, the swing away steering wheel works.
I’m removing the dash and steering housing to repaint, install a new speedo cable and housing, and tune up all the different components of the steering and shifting. Stay tuned, film at eleven, next month I hope… LOL
Mitch
Great photos! I’m trying to replace the gear indicator (the housing with PRNDL on the window). How far into disassembly do I have to go to remove the indicator? I was studying the photo that shows that snap ring tool. Do I need to remove that snap ring? Will I be able to access the housing at that point?
Thanks for the photos.
John
Hi guys,
Interesting read. I’m having my mechanic rebuild my 63 TBird column as it starts in Reverse and there is other damage. One thing he’s asking for is an exploded diagram of the column and in particular about the 3rd last post photo and question. The second last post “I remember a strange nut on the other side that fit in a slot that was used to compress the two halves together”. this “Strange Nut” is missing and apparently is the reason for my column failure. Can anyone shed light on the name of this missing part/nut, give me a best view exploded diagram of the shaft and parts or link to one?
I also need the diagram to include the fixture method of the underside of the Shift Collar Bowl (must be a plate or locking bolts that come up through the bottom of the bowl and hold it onto the column??
Any and all help gratefully appreciated.
Your best bet for a diagram is the shop manual for your car. Reproductions are widely available from parts suppliers and even places like Amazon. If you find the manual inadequate, check out the Osborne assembly manuals or restoration guides available from VTCI.
Thanks I appreciate your feedback.
Hello,
Great website, congratulations. I got a 1964 Landau and will bring it back in perfect shape. Do you know if anywhere is a set available to refresh the steering culumn and shifter. Thanks in advance.
Regards, Guenther
Congrats on your new ‘Bird. I don’t know of any parts house that sells the rebuild kits as a set, since not everyone will need every part. Bird Nest used to have a list of common parts grouped together on their site (http://tbirdparts.com/), but it appears they’ve removed it. I’m sure, though, that they still have everything you would need: upper bearing, lower bushing, centering cone shifter and detente plate. Also, while you have it out, the rag joint should be replaced as well. Good luck!
Thank you for your quick reply and the english names of the needed parts. Without knowledge of this specific names it is very hard to search for the right parts. When the job is done i give a short feedback.
Hi. Thanks for sharing these images. I have a 65 TBird and I’m on the home stretch of having the horn buttons fixed. Can you describe for me the placement of the metal clips and springs located behind the horn buttons? It seems that the springs were missing in mine. I have everything fixed so that the horns do not blow continually, but now there is not enough tension on the buttons. When you get in and out of the car, just bumping the steering wheel causes the horns to blow. 🙂 If you can help I would be most appreciative.
Sorry, Brett, it’s been a while since I’ve dug into the column, so I can’t really give a detailed description. Best bet is probably the shop and/or assembly manuals (both available on Amazon), or post a question to the VTCI forums.
very good comments and answers 5 star thanks .
Thank you so much for this Blog! I am a considerably young 64 T bird owner and like yours was a solid project between father and son. It’s reassuring to know someone has shared the same problems and its not just my car!
Your blog has been very helpful to me! Please keep it running!!
Chris
This blog is great! I am a considerably young 64 T bird owner. A lot of the post you have shared on this blog have been very useful and has reasured me that I was not the only one going through the same problems.
Keep the blog and great posts up!
Chris
Hello. Do you have to take all of this apart to get to the light bulb?
You’ve got to dig down past the horn ring, steering wheel and turn indicator, but no need to remove the collar or the steering column itself. Do yourself a favor before pulling it apart and check at the base of the column and the rag joint to ensure that the ground wires are still there.
thanks for putting together site. say I have a 64 and want to install new shifter, which position does it need to be in to line up correctly on the detent? the column is out of car. Column has been rebuilt. Should I wait to install column back in dash before installing shift lever?
It’s been a while, but I believe you can install the shift lever in any of the positions—you’ll just need to wiggle it around to get it seated properly. I would install it before you put the column in. I’m not a fan of swinging a hammer around inside the car.
Congrats on the new Thunderbird. I hope you enjoy it!